An easy, friendly guide to making adorable bunny clay figures that actually look like bunnies, not blobs. We’ll cover simple steps, clever tips, and a few sneaky tricks to level up your craft game without breaking the bank. Grab your clay, some toothpicks, and your best goofy grin—let’s get fluffy.
Gathering Your Supplies Without The Drama
– Clay: Start with polymer clay if you want something you can bake; air-dry clay works too if you’re patient. Pick a few colors: white, a pinkish shade for the nose, and a couple of accent colors for cheeks or ears.
– Tools: Basic sculpting tools, a toothpick for tiny details, and a rolling pin or smooth object to flatten clay.
– Workspace: A clean surface, a cookie sheet for baking, and parchment paper so nothing sticks to the world—or your fingers.
– Extras: Safety scissors, a small brush for texture, and optional googly eyes if you’re not confident in detailing with clay.
Want to skip the hunt? You can buy a beginner bunny kit online, but DIY always feels better, right?
Choosing a Simple Bunny Design
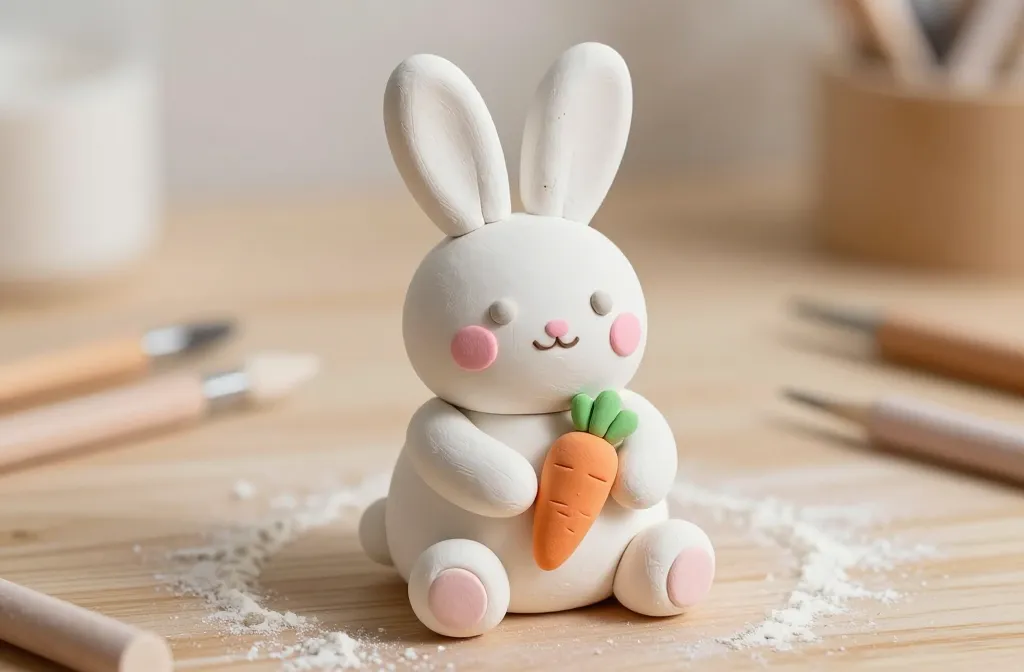
– The classic pose: sitting up with big ears. It’s cute and readable at a glance.
– A tiny hopping bunny: a pose in mid-air with a little carrot for spice.
– A sleeping bunny: tucked into a sweet, curled shape—perfect for a desk ornament.
Think about how detailed you want to go. If you’re brand-new, start with the seated bunny; it’s forgiving and looks instantly recognizable.
Step-by-Step: Build Your First Bunny
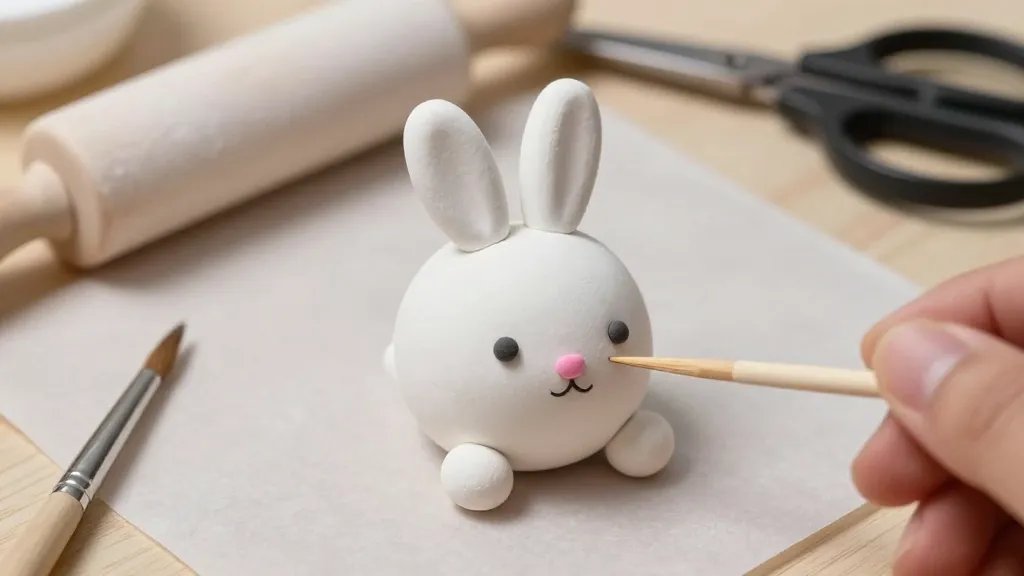
- Shape the body: Roll a small teardrop for the torso, then add a separate ball for the head. Flatten slightly so they sit comfortably together.
- Make ears: Roll two long, skinny cylinders. Use your finger to taper one end and insert them at the top of the head. If they look too stiff, curve them gently with your fingers or a tool.
- Face it: Attach two tiny balls for cheeks, a small pink dot or painted nose, and a few thin lines for whiskers. Pro tip: tiny black beads or a fine-tipped marker work great for eyes if you don’t want to risk smudging.
- Refine shapes: Smooth where the head meets the body, blend joints softly, and press to flatten the base so your bunny can stand on a shelf without tipping over.
- Bake or dry: Follow your clay’s instructions. If polymer clay, bake; if air-dry, leave in a warm spot until fully set. FYI, don’t skip this—soft clay morphs when you touch it later.
Texturing Tricks That Make Your Bunny POP
- Fur texture: Lightly drag a clean toothpick across the body in short strokes to mimic fur. Don’t overdo it—you want hints, not a shaggy mess.
- Ear details: Use a fine tool to etch lines along the ears for a more realistic look. Add a tiny pink wash on the inner ear for dimension.
- Cheeks and nose: A dab of pink on the cheeks and a small dot on the nose creates instant charm. Blending with a fingertip keeps it soft.
Common Pitfalls and How to Fix Them
– Too stiff clay? Warm it up in your hands or a quick 10-second microwave (if your clay is microwave-safe). Then reshape.
– Eyes looking wonky? Use a tiny brush or toothpick to reset—small is powerful here.
– Sticky mess after baking? Ensure you followed temperature guidelines exactly and let it cool completely before handling.
Color Palette: Making Your Bunny Unique
- Classic white with pink accents: Timeless and adorable. Great beginner palette.
- Brown or gray with white belly: Grounded and cozy; looks like a fluffy forest buddy.
- Pastel trio: Soft lilac, mint, and peach tones for a whimsical vibe.
Accessorize Without Going Overboard
– Attach a tiny bow, a carrot charm, or a mini flower crown to switch up the look.
– Paint tiny paws on the feet for extra personality.
– Create a mini scene: a little carrot, a patch of grass, or a tiny mushroom to sit beside your bunny.
Creative Variations: Turning One Bunny Into a Collection

– Change the pose: tilt the ears, bend the body, or sit the bunny on a ceramic plate or little stand.
– Seasonal twists: add a scarf for winter, a flower for spring, or sunglasses for a playful twist.
– Pair with friends: make two or three bunnies of different sizes to tell a tiny story.
Finishing Touches and Display Tips
– Seal the deal: If using polymer clay, a clear glaze can add gloss and protect your sculpture. If you went with air-dry clay, sealant helps prevent smudges.
– Display ideas: Floating shelf, desk corner, or a tiny gallery wall. Group bunnies with other mini-creations to create a cheerful vignette.
– Maintenance: Wipe gently with a soft cloth. Avoid direct sunlight for long stretches to prevent colors from fading.
FAQ
Can I use any clay for this bunny tutorial?
Yes, you can start with air-dry clay for a no-bake option or polymer clay if you want a durable, bake-and-keep piece. Just follow the product’s instructions on curing and handling. FYI, polymer clay needs heat to set properly, so don’t skip the bake step.
What if I don’t have tiny eyes or beads?
Use a fine-tipped marker or paint to draw eyes. You can also press in small beads or use clay to create raised eyes. It’s all about finding what you’re comfortable with and what looks cute to you.
How long does it take to finish a bunny like this?
First-time bunnies can be done in 30 to 60 minutes, plus bake or dry time. If you’re taking your time with texture and painting, plan for a cozy afternoon. IMO, patience makes all the difference when the tiny details start popping.
Do I need special tools for textures?
Not really. A few basic tools do the job: a toothpick, a small sculpting tool, a blunt needle or pin for whiskers, and a soft brush for smoothing. If you want to level up, a silicone clay scraper works wonders for clean lines.
How can I fix a wonky ear or a loose head?
Gently reattach with a tiny bit of fresh clay or polymer glue if using polymer clay. Press-on and blend the seams softly with your finger or a tool. Allow extra drying or baking time after adjustments to prevent new mishaps.
Conclusion
Making a cute bunny clay figure is the perfect blend of accessibility and cuteness. You don’t need a studio to get results that spark joy—just a few supplies, a dash of imagination, and a willingness to giggle at your own mistakes. FYI, the more you practice, the faster your bunnies will bloom into tiny, lovable sculptures. Ready to start your bunny army? Grab your clay and let your inner sculptor hop to it.


