
An adorable little hedgehog clay sculpture is easier than you think. You’ll wow friends with a tiny forest critter that fits on your desk. Let’s dive in and sculpt something you’ll actually brag about.
Why a Tiny Hedgehog? The Charm Is Real
Hedgehogs look unassuming, but their little spines and button noses are oddly satisfying to recreate. Tiny sculptures let you practice without committing to a big project. FYI, small brings big smiles—you’ll finish fast and still feel accomplished.
Materials You Won’t regret Buying
- Air-dry clay or polymer clay (some brands cure in a toaster oven, which is a vibe)
- Clay tools: ball stylus, needle tool, and a small silicone brush
- Acrylic paints in browns, creams, and black
- Sealant or varnish for a shiny or matte finish
- A little water and a spray bottle for smoothing
Getting the Shape Right: The Core Steps

Start with a simple ball, then add the nutty little details that make a hedgehog unmistakable. Ready? Let’s roll.
Step 1: Create the Body
- Roll a smooth ball about the size of a gumball for the torso.
- Pinch or flatten one end slightly to form the rounded belly. Don’t go flat—hedgehogs aren’t pancakes.
- Use a smoothing slip (a dab of water works) to blend seams. You want stealthy joins, not chunky gaps.
Step 2: Add the Head
- Roll a smaller ball for the head and attach it to the front of the body with a gentle pinch of clay at the neck.
- Flatten the bottom a touch so the hedgehog can stand upright if you want a shelf buddy.
- Place two tiny indentations for eyes and a small rounded bump for a nose.
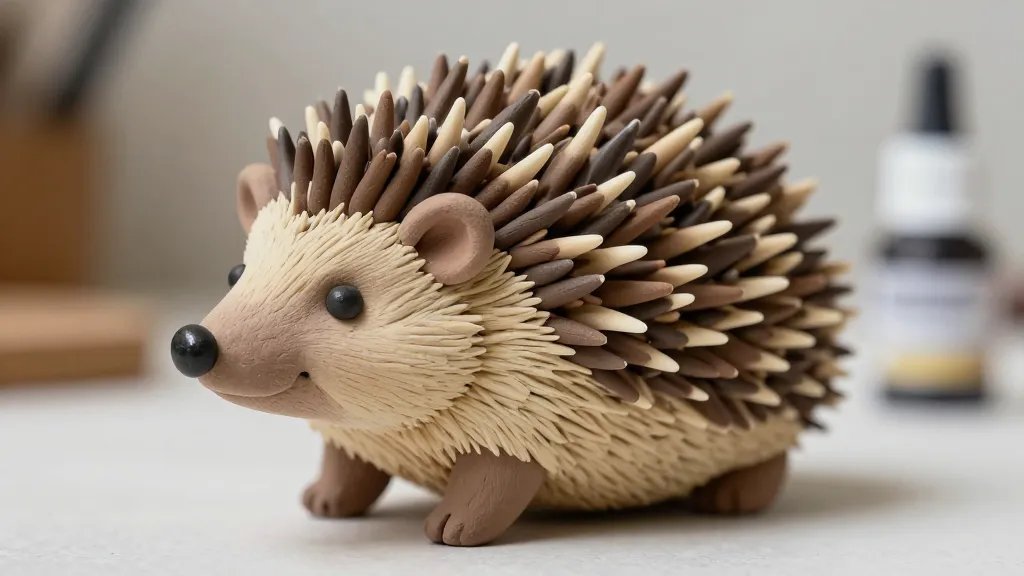
Step 3: The Spines
Here’s where the magic happens. Spines give the hedgehog its personality, so take your time.
- Use a toothpick or needle tool to make short, curved lines along the back. Vary their length for a more natural look.
- Option A: Poke tiny slits and push in thin clay strips as spines, layering from back to front.
- Option B: Score shallow lines and brush a fine texture with a stiff brush.
Step 4: Feet and Tiny Details
- Roll two tiny ovals for feet and attach under the body.
- Scratch a tiny tail at the back—just a little nub will do.
- Add a small patch of lighter clay around the belly to suggest shading.
Texture Tricks: From Flat to Fascinating
Texture sells the illusion of fur without getting bogged down in realism. Try these quick hacks.
Surface Smoothing
Keep your hands damp or spray with a light mist to avoid sticking. Pass a clean finger along the surface for a sleek finish, then let it dry a bit before you sculpt more.
Fur Effects Without a Comb
For the spines, work in tiny, directional strokes. If you mess up, don’t panic—you can re-wet and re-sculpt. IMO, a little texture goes a long way.
Color Play: Painting Your Tiny Hedgehog
Color adds personality. Pick a simple palette and layer thoughtfully.
Base Coat
Paint the body a warm brown or tan. Let it dry completely before you add details. A dry brush technique can give a fur-like feel without heavy brush marks.
Spines and Shading
Use a slightly darker shade for the spines and a lighter shade on the belly. A subtle wash over the spines can bring out depth—just a touch, so you don’t look like a candy cane.
Eyes and Nose
Paint tiny black dots for the eyes and a small dot for the nose. Glossy accent can make them pop, but go easy—no disco balls on a tiny woodland critter.
Finishing Touches: Seal the Deal
Sealing protects your sculpture and gives you options. A matte finish keeps it natural, while a gloss adds whimsy.
Why Seal?
Sealants protect from dust and humidity. They also set colors so you won’t smudge your masterpiece while it cures. FYI, some sealants amber with time, so choose a matte clear if you want a timeless look.
How to Apply
Apply a thin, even coat with a soft brush. Let it dry completely, then add a second coat if needed. Don’t rush—layering gives you a sturdier figure.
Display Ideas: Show Off Your Tiny Masterpiece
Where will your hedgehog chill? Here are some fun spots and setups.
- Desk buddy with a tiny plant and a mug of pencils
- Mini shelf diorama with mushroom house accents
- Gift for a friend who loves critters
Troubleshooting: Quick Fixes for Common Hurdles
No project is perfect on the first try. Here are fast fixes to save your sculpture.
Clay Won’t Stick?
Calories and glue aren’t involved here—humor aside, it’s likely you have too dry clay. Knead a bit of moisture back in or wrap and rest, then try again.
Cracks During Drying
Cracks happen when the clay dries unevenly. Use a damp brush to smooth the area, then re-sculpt the seam with a tiny amount of fresh clay blended in.
Spines Fall Off
Attach new spines with a small amount of slip (water and clay). Hold gently until the bond sets, or press in a tiny clay pin to help hold them in place.
FAQs
How small can a hedgehog sculpture be?
Pretty tiny. A fingertip-sized hedgehog is totally doable and super cute on a desk. Don’t overthink it—scale trains your eye more than your hands.
What clay works best for beginners?
Air-dry clay is forgiving for beginners. Polymer clay is great if you want a durable piece that cures in a kitchen oven. Pick what fits your craft vibe and schedule.
Do I need special tools for the spines?
Nope! A simple needle tool, a toothpick, or a fine brush handle works. The goal is texture, not perfect uniformity.
How long does it take to finish a tiny hedgehog?
About 30–90 minutes for a finished piece, depending on detail. If you’re new, it might stretch to a comfy hobby afternoon. IMO, the pace is part of the fun.
Can I bake polymer clay at home?
Yes, but follow the brand’s instructions exactly. Some polymer clays cure in a regular oven at low temperatures. Always preheat and monitor closely to avoid melting your masterpiece.
Conclusion
Tiny hedgehogs are perfect practice with big payoff. You’ll refine your shaping, texture, and painting without committing to a large sculpture. Grab your clay, give yourself permission to have fun, and let that little spiky buddy bloom on your desk. You got this, and FYI—you’ll probably want to make a herd.


