An all-ages hobby that looks adorable and totally doable? Yes, please. If you’ve ever wished your keys could double as a cute accessory, you’re in the right place. Let’s dive into bubbly, tiny charms that brighten up any bag or set of keys—and maybe your mood, too.
Why mini kawaii charms are the move
Kawaii charms are playful, affordable, and surprisingly satisfying to make. They give you a tiny canvas to experiment with color, texture, and personality. Plus, they’re perfect for gifting or selling at a local craft fair. FYI, you don’t need fancy gear to start—just a bit of patience and a lot of charm.
What you’ll need to get started
- Polymer clay in your favorite colors
- Clay tools or a simple toothpick for details
- Small jump rings or eye pins for attaching to keychains
- Keychain chains or cord to finish the look
- Super glue or strong craft glue
- Oven and baking sheet (follow clay package directions)
- Optional: metallic acrylic paint, glaze, or epoxy resin for shine
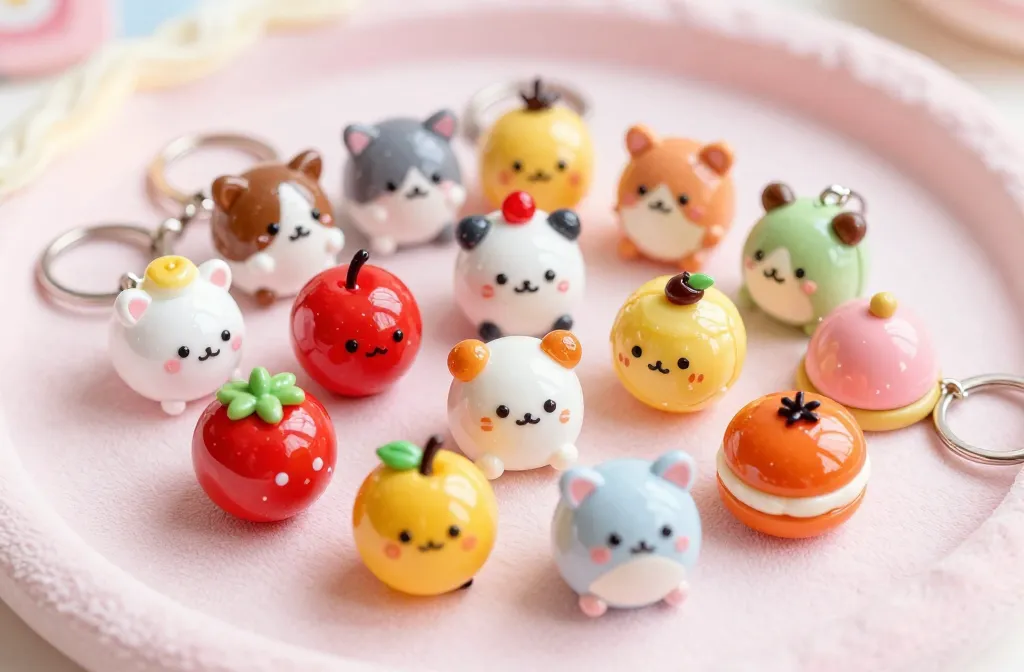
Choosing your minis: character ideas that pop
When you’re picking ideas, think of things that are instantly recognizable in a tiny form. Cute animals, fruits, desserts, and mystic celestial icons all translate well to mini charms. Start with a few simple designs to build confidence, then level up with more details.
Start simple: go-to starter designs
- Mochi-style animals (cats, bears, or panda silhouettes)
- Pastel fruits (strawberries, peaches, or little apples)
- Mini desserts (dango, donuts, or macarons)
Texture and personality
A little swirl of frosting, a tiny smile, or a glossy eye will bring your charm to life. Don’t overthink it—tiny imperfections look cute, too. Remember, practice makes cute.
Shaping and baking your first charms
Start with soft, pliable clay and roll it to about a 3–4 mm thickness for sturdiness. Smooth any seams and add details with a sharp tool. Bake according to the clay’s instructions, then let cool completely before handling.
Tips for clean shapes
- Use a flat surface and light pressure to avoid cracking
- Roll evenly so pieces bake uniformly
- Hide seams by rounding edges for a soft, donut-like finish
Finishing touches that wow
After baking, you can add gloss glaze or a drop of epoxy resin for a shiny, durable seal. A bit of black paint can define eyes and outlines. If you want extra durability, bake a second time after painting—but check your glaze’s compatibility first.
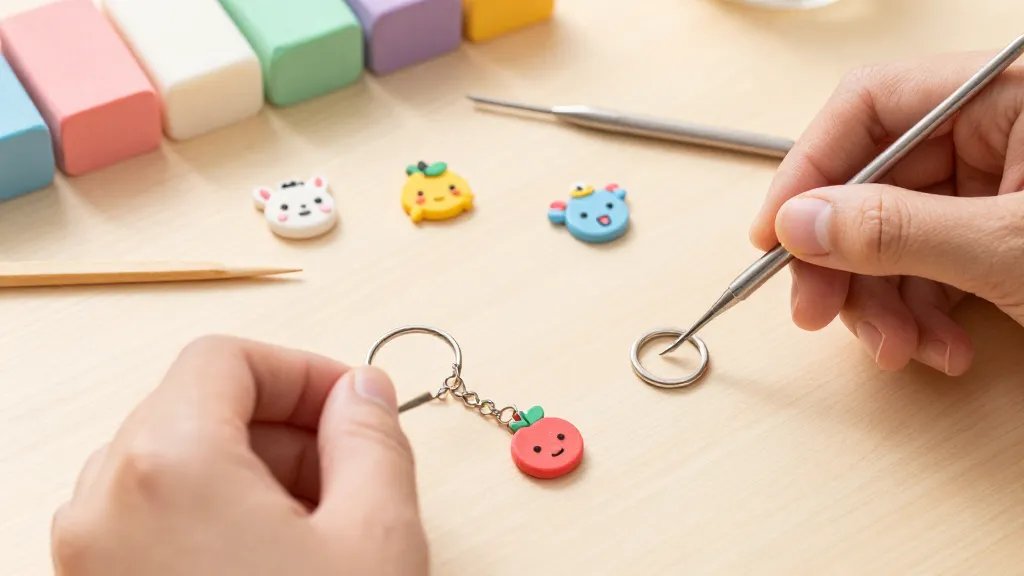
Assembling the keychains: from charm to showpiece
Attaching your charm to a keychain is easier than you think. You’ll be surprised how a small jump ring and a sturdy chain can turn a tiny sculpture into a wearable delight.
Step-by-step assembly
- Attach a jump ring to the top loop or hole of your charm while the clay is still a bit flexible, if possible.
- Let the glue set, then thread the jump ring onto the keychain ring or split ring.
- Attach to a keychain chain or a leather cord for a different vibe.
Making them safe and durable
Use a strong glue and ensure all parts are fully cured before assembly. Add a clear glaze or epoxy to seal the charm after assembly for extra longevity.
Color theory and styling: making your charms pop

Color is your friend here. Soft pastels read kawaii; bold, saturated colors feel playful and modern. Consider a simple color palette for each charm to keep designs cohesive, especially if you’re making sets.
Simple palettes that work
- Candy pastel trio: lavender, mint, peach
- Primary pop: red, blue, yellow
- Mono with a twist: pink shade variations with white accents
Adding tiny accents
Tiny details like a white highlight dot, a tiny blush circle, or a glossy eye can transform a flat clay piece into a lively character. Use a fine brush or toothpick to place these accents precisely.
Storage, organization, and keeping your vibe consistent
Keep your clay pieces organized by color or design family. Store unfinished pieces in sealable bags to avoid drying out, and set up a dedicated crafting space so you can grab what you need quickly.
Work surface and cleanup
A silicone mat keeps your workspace tidy. Wipe surfaces with a damp cloth between colors to avoid color transfer. FYI, gentle dish soap helps when you’re done rather than harsh cleaners.
Monetizing your hobby (if you’re feeling ambitious)
If you want to turn this into a side gig, start by making small, themed sets and offering customization. Photos matter, so take close, well-lit pictures for listings. Price thoughtfully: materials, time, and a little profit margin.
Pricing quick guide
- Single charm: $5–$12 depending on complexity
- Small set (3–5 charms): $15–$40
- Customized charms: base price + per-detail customization
FAQ
Do I need a kiln to bake polymer clay charms?
Polymer clay bakes in a standard kitchen oven. Follow the package directions for temperature and time. No fancy kiln required, just careful monitoring.
How long do mini kawaii charms last?
If you seal them well and handle them gently, they last for years. The key is proper curing, sealing, and avoiding rough play with the charms.
Can I mix different clays in the same charm?
Yes, you can layer different colors and clays. Let each layer cure a bit if the designs are intricate to prevent smudging.
What’s the best way to attach charms to keychains?
Jump rings work wonders. Use a small pair of needle-nose pliers to open and close them securely. For extra durability, glue the ring to the charm after curing.
How do I start selling these online?
Take crisp photos in natural light, show multiple angles, and include close-ups of details. Write a friendly, concise description and use keywords like “kawaii charm,” “polymer clay,” and “DIY keychain” to attract shoppers.
Conclusion
Mini kawaii charms are a deliciously doable craft that yields big smiles. With a little practice, you’ll be cranking out adorable characters faster than you can say “slice of cute.” So grab your clay, pick a palette, and start creating charms that charm everyone who sees them. Ready to jam some color onto your keys? Let’s go make something irresistibly tiny.


