
An eye-catching twist on a timeless craft: wooden Easter eggs that aren’t just for display. You’ll be amazed how easy it is to turn plain wood into artful eggs your family will actually want to hide and find. FYI, this guide is for all skill levels, so grab your paintbrush and let’s get crafty.
Why wooden eggs? The charm that clay and plastic can’t match
Wood has personality. It’s forgiving, sustainable, and takes paint, stain, and markers like a champ. Plus, wooden eggs stand up to real-world Easter chaos—little hands, running glue, and the occasional sticky snack attack. Ready to unlock some character? Let’s dive in.
Getting started: what you’ll need
- Blank wooden eggs (real wood or lightweight plywood works great)
- Paints (acrylics are best for longevity)
- Fine-tipped brushes and markers
- Stencils or painter’s tape for clean lines
- Sealant or mod podge for protection
- Optional: woodburning tool for added detail
Simple designs that pop (perfect for beginners)

You don’t need to be a master painter to make something magical. Here are quick wins that still look chic.
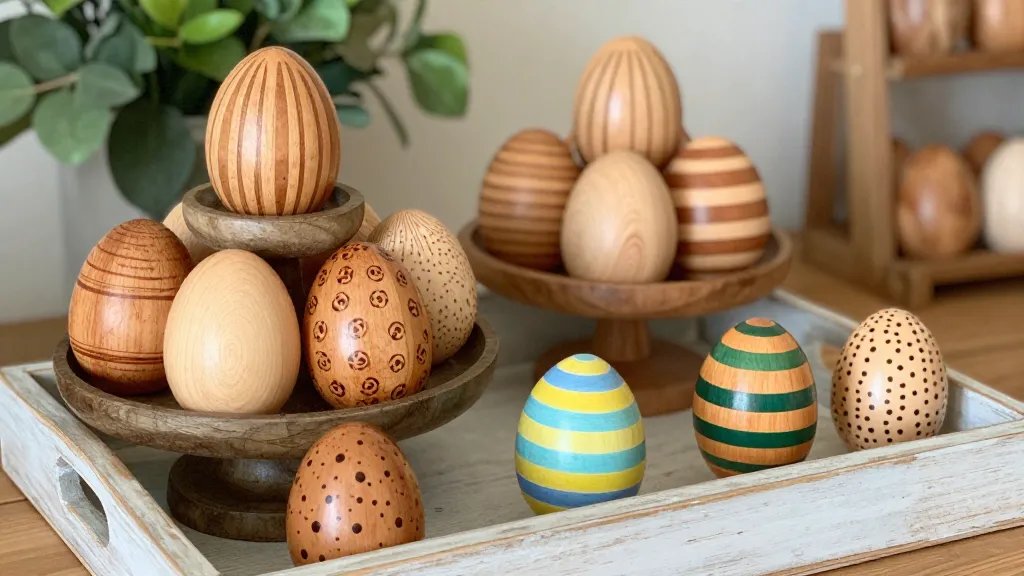
Minimalist geometric eggs
Dip into bold color blocks or crisp black lines. Tape off sections, snap on a couple of triangles or stripes, and peel. The result? Modern vibes with zero stress. If you’re feeling extra, add a metallic palate for a luxe finish.
Floral silhouettes
Tiny silhouettes of flowers or leaves bring spring into your living room without needing meticulous shading. Use a fine brush to paint stems and blooms, then dot in tiny buds for texture. Think airy and fresh, not fussy.
Monogrammed keepsakes
Personalize a batch with initials or family names. It’s a small touch that makes Easter morning feel special. Pro tip: pick an elegant script and seal with a matte finish so the letters stay readable.
Creative techniques that elevate the look
If you want more wow without extra stress, try these finishes and tricks. FYI, you’ll thank yourself later.
Wood grain accents
Let the wood do the talking. Sand lightly, then lightly brush a contrasting color along the grain to highlight patterns. Finish with a clear sealant to keep the grain popping for years.
Stenciled patterns
Stencils aren’t cheating; they’re insurance for clean lines. Use painter’s tape to keep edges sharp and layer colors for depth. It’s amazing how a simple pattern can transform a plain egg.
Marble effect without the mess
Blend a couple of light, cloudy colors with a dab of white and swirl on with a cotton swab. Don’t overblend—you want veining, not a smoothie. A soft satin seal keeps the look classy.
Textures and tactile fun
Texture adds personality. Try these ideas to make eggs you want to touch (and display).
Quilted look with tiny stitches
Use a fine brush to create a subtle crosshatch that mimics quilting. Then dab a tiny dot at each intersection to mimic stitching. Seal to prevent snagging fingers during egg-hunting.
Sparkly accents for the party stove
A sprinkle of fine glitter on a few strategic spots brings the party vibe. Use a light hand—too much glitter gets everywhere, and nobody wants a glitter explosion at Easter brunch.
Eco-friendly and kid-friendly ideas
Crafting with kids is chaotic in the best way. Here are ideas that survive fingerprints, snacks, and curiosity.
Washable paints and wipes
Opt for non-toxic, washable acrylics or tempera paints. Keep a damp cloth handy to wipe hands and desks. FYI, a quick cleanup beats scrubbing dried paint later.
Collaborative family eggs
Assign each person a section or pattern. You’ll end up with a gallery that feels like everyone contributed something special. It’s more fun than solo projects—and memories, too.
Storage, protection, and display tips
You’ll want these eggs to last beyond Easter Sunday. A little love goes a long way.
- Let coats dry fully before sealing, or colors will smear.
- Use a light, non-yellowing sealant to preserve color over time.
- Store in a cool, dry place to prevent warping or fading.
- Display on a pastel-hued tray or perched on faux grass for an instant centerpiece.
More than eggs: turning wooden eggs into decor that lasts
Wooden eggs aren’t just for Easter. With the right designs, they become year-round decor or thoughtful gifts.
Seasonal swaps
Paint eggs to match seasons—muted tones for spring, metallics for holiday decor, or bold palettes for summer. Keep a few neutral eggs on standby to mix and match.
Giftable keepsakes
Stencil a date, initials, or a tiny heart and tie a ribbon around the egg. It becomes a charming, handmade gift that doesn’t scream “craft project.”
FAQ
Are wooden eggs durable for kids’ activities?
Yes. Wooden eggs stand up to rough handling far better than plastic or paper mâché. They’re easy to wash and re-paint, which makes them perfect for a multi-year Easter craft tradition. Just supervise when using sharp tools like a woodburner.
What finishes are best for longevity?
Acrylic paints with a clear matte or satin sealant work well. They protect colors without making the surface look plastic. If you crave extra shine, a light gloss can be used sparingly on specific accents.
How can I DIY blank wooden eggs?
Most craft stores carry blank wooden eggs in various sizes. If you can’t find them, slice a small wood dowel into egg shapes, sand them smooth, and seal with a light coat of paint. It’s a budget-friendly workaround.
Can I use stencils on wooden eggs?
Absolutely. Tape helps keep stencils in place, and you can use a gentle dabbing motion to avoid bleeding paint. Remove the stencil while the paint is still slightly wet for crisp edges.
What if I want a rustic look?
Sand the eggs with a rougher grit before painting, or apply a light wash of paint and wipe off excess. A little wood texture peeking through looks intentionally imperfect and very cozy.
Conclusion
Wooden Easter egg crafts bring warmth, personality, and a dash of whimsy to any home. From minimalist geometric patterns to delicate monograms, there’s a style for everyone—even if you’re not an art whiz. So grab some wood, brushes, and a dash of patience; your future Easter table will thank you. Happy crafting, and may your eggs crack smiles, not crafts frustration.


