
An ice-cold brainstorm just met a craft desk and boom—summer magic. If you thought ice cream crafts were only for kids, think again. We’re whipping up mini creations that are cute, kitschy, and totally Instagram-ready.
Whipping Up Mini Ice Cream Sensations

Short on space but full of flavor? Let’s craft tiny ice cream masterpieces you can hold in your hand and in your heart. These projects blend creativity with a dash of whimsy, so you’ll actually want to display them, not stash them in a drawer.
What You’ll Need (Spoiler: It’s Surprisingly Simple)
– Lightweight polymer clay or air-dry clay in pastel colors
– Small wooden or foam ice cream cones
– Acrylic paints and tiny brushes
– Fine glitter, sequins, and tiny beads for sprinkles
– Toothpicks or craft picks for structure
– Clear glaze or gloss sealer
– Optional: faux frosting, tiny charms, micro beads
Think: DIY food with a sprinkle of art class. You can keep costs low by raiding your kid’s craft stash or repurposing leftover beads. FYI, assembling little cones is almost meditative—like a tiny pastry chef moment without actual calories.
Classic Cone Minis: The Cornerstone of Summer Crafting
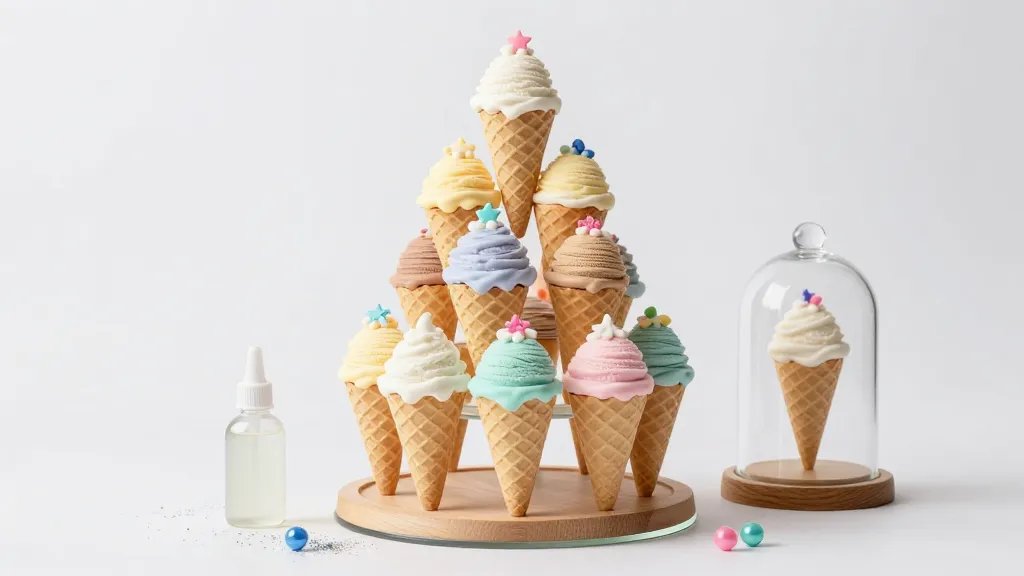
There’s something inherently cozy about a miniature ice cream cone. It’s both nostalgic and endlessly adaptable. Here’s how to master the classic cone mini and then level it up.
Base Cone Basics
– Shape: Start with a tapered cone of clay or foam. Smooth the seam where the scoop sits so it catches the light, not fingerprints.
– Color: Pick a base scoop color (think pistachio, strawberry, or vanilla). Layer lighter or darker swirls for a scoop that looks real enough to nibble.
– Finish: Bake or air-dry, then seal with a gloss finish to give it that glossy, “just scooped” look.
Sprinkles That Spark Joy
– Use a tiny brush to apply a dab of glue and sprinkle tiny beads or glitter on top.
– For non-messy fun, embed micro beads into the frosting while it’s still soft.
– Pro tip: A few teeny gold or iridescent sprinkles instantly upgrades your mini to “gallery-worthy.”
<h2 Interactive Edible-Inspired Pieces
These aren’t edible, but they evoke the feel of your favorite summer treat. The trick is texture: shiny scoops, soft matte cones, and a touch of whimsy with toppings.
Drip-Glaze Delights
– After painting, add a thin drip of glaze to simulate melting ice cream. It gives your piece motion even when it’s stationary.
– Work quickly to create natural drips that don’t run off the edge. If you go too far, simply trim and remake the drip on a fresh base.
Frosting Textures Without the Mess
– Mix a tiny amount of acrylic paint with a dab of white glue to imitate frosting. Dab with a toothpick for ridges.
– Add mini pearls or sequins to imitate sugar crystals. FYI, it’s the little details that sell the look.
<h2 Personalizing With Summer Themes
Summer is a vibe. Bring in beachy, fruity, and sunset elements to make each mini feel like a tiny postcard from vacation.
Beach-Day Bowls
– Use light blue or teal scoops with sandy cone textures.
– Add a wedge of lime, a mini seashell charm, or a swizzle-stick flag to echo a beachside dessert cart.
Fruit-Filled Fun
– Stack two contrasting scoops to mimic a layered fruit sundae.
– Add tiny fruit slices (made from clay or paper) perched on the rim.
– A tiny umbrella or fruit slice charm instantly conveys summer yes-please.
<h2 Display Ideas That Don’t Make You Roll Your Eyes
A craft deserves a cute home. Here are simple, stylish ways to showcase your mini ice creams without turning your desk into a craft store.
Mini Gallery Shelf
– Line a shallow display shelf with a pale velvet or cork backdrop.
– Arrange your minis in ascending height order for a tidy, museum-like vibe.
– Add a tiny label with colors and materials for a pro touch.
Floating Frames
– Mount a few mini scoops in small shadow boxes or shallow frames.
– Create a rotating set: swap in new colors and toppings every few weeks to keep it fresh.
– It doubles as wall art and a conversation starter.
<h2 Seasonal Techniques: Quick Tricks to Level Up Fast
If you’re short on time but want impact, these quick techniques will have your minis looking professional fast.
The Shimmer Trick
– Lightly dust a tiny amount of iridescent powder on the scoops before sealing.
– It catches light from every angle and makes your minis pop on camera.
The Melted Look Without the Mess
– Apply a thin coat of clear glaze near the top edge to create a glossy “melt” effect.
– Layer a tiny amount of white paint above for a soft drip that reads as “melting” without pooling.
<h2 FAQ
Are these mini ice cream crafts beginner-friendly?
Yes. Start with one or two colors and a few toppings. The cones are forgiving, and you can blend colors with simple swirls. You’ll gain confidence quickly as you see each piece come together.
What materials are essential for beginners?
Clay or air-dry clay, a handful of paints, a clear gloss sealer, a few decorative elements like beads or glitter, and basic tools such as a sculpting stick and a fine brush. You can improvise with household items, like bottle caps for tiny round scoops.
How can I avoid messy glue everywhere?
Work on a protected surface and use sparing amounts of glue. A toothpick helps control the glue flow. Pro tip: lay down parchment or a silicone mat so you can lift pieces without sticking.
Can I make this kid-friendly for a craft party?
Absolutely. Set up a “mini shop” with pre-made cones and a variety of scoop colors. Have an assembly line: paint, dust with a color, add toppings, glaze, and seal. It’s chaotic, in a cute way, and everyone leaves with their own mini masterpiece.
How do I keep these minis durable for display?
Seal with multiple light coats of gloss. Let each coat dry completely. If you’re transporting, place pieces in a shallow box with soft padding to prevent breakage. Acryllic seals hold up well in a bright, humid summer room.
Conclusion
Summer mini ice cream crafts are all about quick wins, playful textures, and sensory delight. You don’t need a full studio to create something that feels a little magical and a lot Instagrammable. So grab your clay, scatter a few sprinkles, and let your imagination churn. FYI, the best part is you’ll actually enjoy displaying these tiny treats as much as you enjoyed making them. Ready to start scooping up some summer joy?


