
An egg-cellent guide for decorating without the mess. You’ll discover clever hacks, quick tricks, and surprisingly stylish results with minimal cleanup. Let’s skip the fuss and dive into creative ideas that actually work in real life.
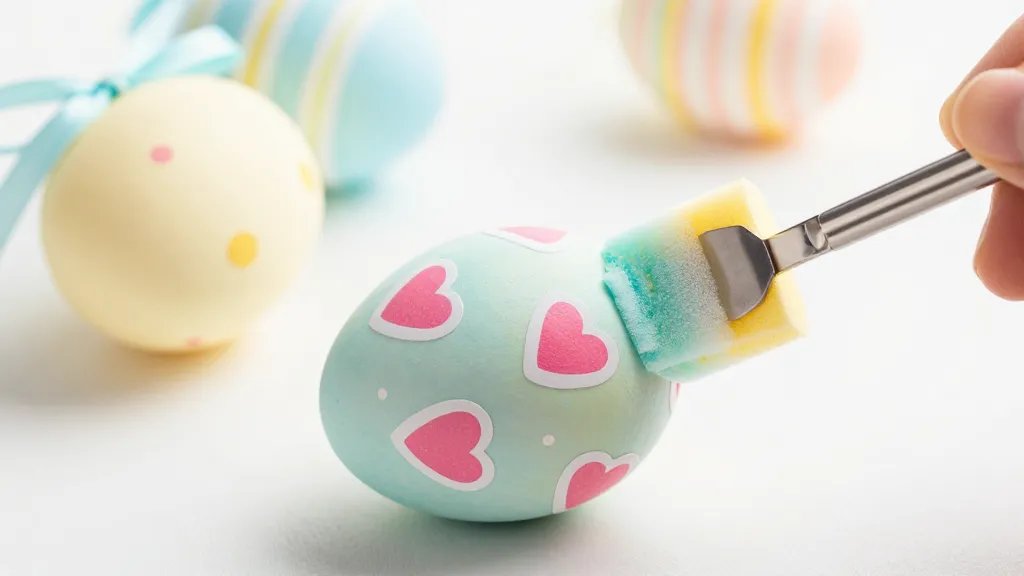
1) Sticker-and-Sponge Stencil Magic
If you hate taping intricate designs, this method is your new best friend. Use bold stickers as your masking shapes, then dab on color with a sponge. Peel away, reveal crisp edges, and boom—clean, playful patterns without fingerprints everywhere.
How to do it in 5 easy steps
- Gather large sticker shapes (hearts, polka dots, stripes).
- Place stickers on dry eggs—press firmly so dye won’t sneak underneath.
- Use a cosmetic sponge to dab dye on the exposed areas.
- Carefully lift stickers while the egg is still damp for sharp lines.
- Let dry, then add a coordinating ribbon for a cute touch.
2) No-Mizzle Dye Jars: Tint, Not Splat
DIY dye jars are a classic, but messy pouring can ruin your vibe. Transition to a no-mess approach: small jars with splash guards or squeeze bottles. It gives you control, reduces spills, and still delivers vibrant hues.
Tips for clean, bold color
- Use plastic condiment bottles for precise application.
- Mix a tiny amount of food coloring with a lot of water for pastel, less-saturated tones.
- Keep an old towel handy to catch drips and wipe hands between colors.
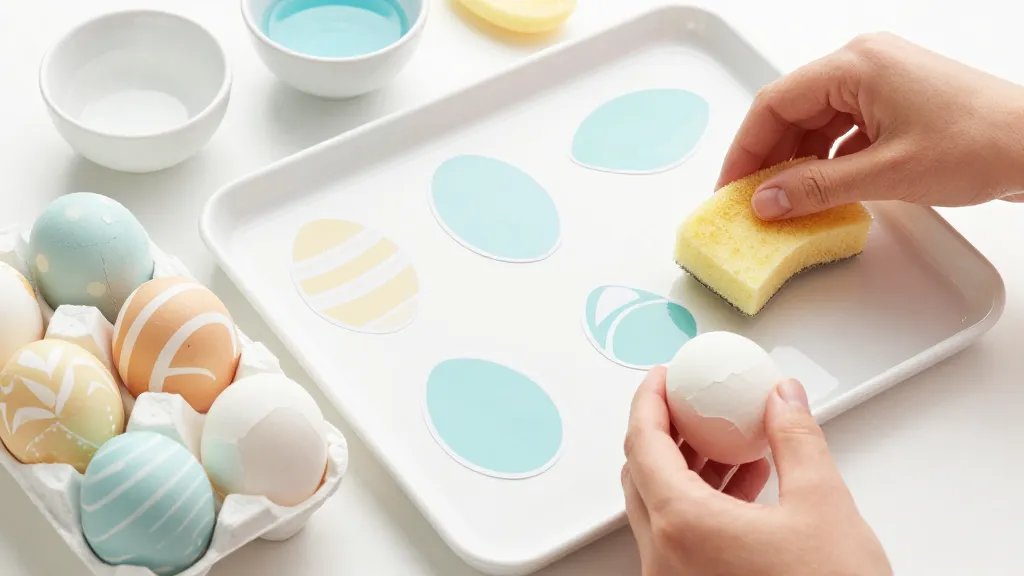
3) Washable Stickers and Decals: Reuse and Glow
Stickers aren’t just for kids. Fancy up eggs with reusable decals that can be peeled and reapplied. They’re perfect for mixed-media looks and avoid any dye seeping under the design.
Who should try these decals?
- Beginners who want a polished result fast.
- Anyone hosting a multi-theme Easter egg hunt and needing consistent patterns.
- People who hate washing brushes mid-decorating sessions.
4) Natural Elements: Minimal Fuss, Maximum Charm
If you crave an earthy aesthetic, natural dyes and textures deliver without the chemical vibe. Tea, coffee, turmeric, and beet juice create warm, organic tones. Pair with twine, herbs, or dried flowers for a charming, low-cleanup look.
What to mix and match
- Beet juice for pinks and purples
- Turmeric for sunny yellows
- Strong tea for muted browns and grays
5) Wrapping Paper Patterns: Decorate the Egg, Not the Mess
Use lightweight washi tape or decorative wrapping paper to cover portions of the egg. This keeps dye off your fingers and reduces smudges while giving you a crisp, modern graphic look.
How to snag the best results
- Cut tape into fun shapes beforehand to speed up the process.
- Wrap tiny sections of egg with paper or tape before dunking.
- Seal finished eggs with a quick spray of clear, edible-safe sealant.
6) Egg Dazzle with Dry Brush and Metallic Accents
If you’re going for glam, dry brushing and a touch of metallic paint add chic texture without a flood of color. A dry brush rolls on lightly, catching ridges for a subtle, sophisticated finish.
How to pull it off without looking like a disco ball
- Dip just the tip of a dry brush into metallic paint.
- Lightly brush along ridges or patterns you’ve already laid down.
- Finish with a matte sealant to tame the shine.
7) Texture Tricks: Use Cloth, Sand, or Glitter Sparingly
Texture adds depth without complexity. A light dusting of glitter in a corner or a touch of velvet-like powder on the dried egg can create wow-factor. Just don’t go full avalanche—keep it tasteful.
Smart texture use
- Pick one texture per egg for cohesion.
- Apply with a small brush or fingertip to control fallout.
- Seal with a clear, food-safe topcoat to prevent shedding.
FAQ
Are no-mess Easter egg decorating ideas safe for kids?
Absolutely. Choose kid-friendly dyes, non-toxic materials, and keep the workspace protected with a washable mat. The Sticker-and-Sponge method is especially forgiving for little hands and big imagination.
What if I want to reuse eggs for another holiday?
Most of these methods work across seasons. Wash and dry the eggs, then apply a new design. Reuse saves money and reduces waste, which is a win in my book.
How can I seal the eggs without making them soggy?
Use a light, edible-safe sealant or a clear acrylic spray designed for crafts. Apply in thin layers and let each one dry completely before touching again.
What are the best dyes for vibrant colors without mess?
Try dye tablets or gels in squeeze bottles. They give you control and less splatter. FYI, darker colors can show more smudges, so plan accordingly.
Can I do this indoors without staining everything?
Yes, if you prep a dedicated decorating area with a tray, placemats, and a washbasin nearby. A little planning goes a long way toward keeping surfaces pristine.
Conclusion
No-mess Easter egg decorating isn’t sacrifices; it’s smarter decorating. You get bold, beautiful results with less cleanup, more fun, and fewer headaches. So pick a technique, gather your supplies, and let the colors do the talking. FYI, you’ll probably surprise yourself with how stylish simple ideas can look when you commit to a clean, creative approach.


