An ultra-compact guide to turning clay into adorable mini mascots you can carry in your pocket or on your desk. We’ll break down the process, share tricks, and keep things light so you actually finish more projects than you start.
Why Tiny Mascots Are The Best Hobby For Busy Hands
Tiny clay mascots are surprisingly satisfying. They fit in a palm, travel in a pocket, and somehow brighten a dull day. Plus, they’re forgiving: if you mess up, you can squash them back into a ball and start over. FYI, they also make great gifts for friends who need a little whimsy in their lives.
Gather Your Supplies In One Quick Sweep
Before you dive in, checklist time:
- Colored polymer or air-dry clay (you choose the vibe)
- Clay tools or simple household items (toothpick, needle, toothpick ends work fine)
- A small work mat or protection for your surfaces
- Sealant or varnish (optional, for shine and durability)
- Sandpaper or a soft file for smoothing (optional but nice)
Keep your workspace calm and organized. A tidy zone equals fewer excuses to quit after the first squishy limb.
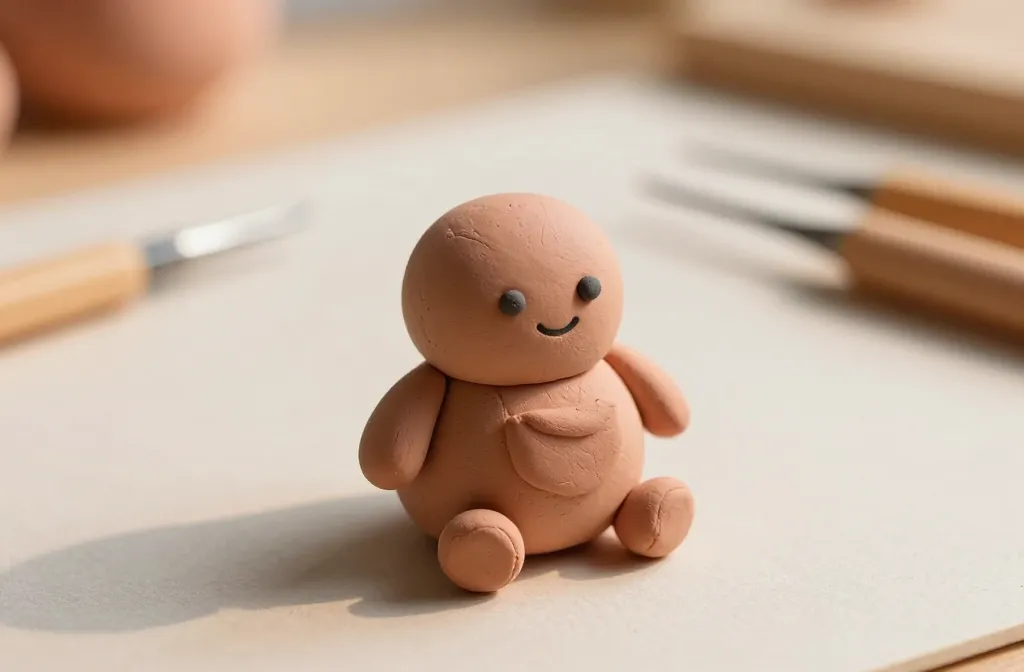
Step 1: Shape The Core Mascot
Start with a simple base shape that defines the character. Round heads, tiny bodies, little stumpy limbs—keep it bold and uncomplicated. This is where your mascot’s personality begins to show.
- Roll a ball for the head. Flatten slightly on the bottom so it sits steady.
- Roll a smaller ball for the body. Attach with a gentle pinch or a dab of clay as glue.
- Use a tool to sculpt out ears, snouts, antennas, or whatever makes your mascot unique.
Tips For A Solid Foundation
– Don’t overwork the clay at this stage; you’ll crush the character’s charm by over-sculpting.
– Use a dab of moisture if your clay stiffens; a tiny bit keeps seams soft.
– If it wobbles, add a tiny support piece inside and let it cure.
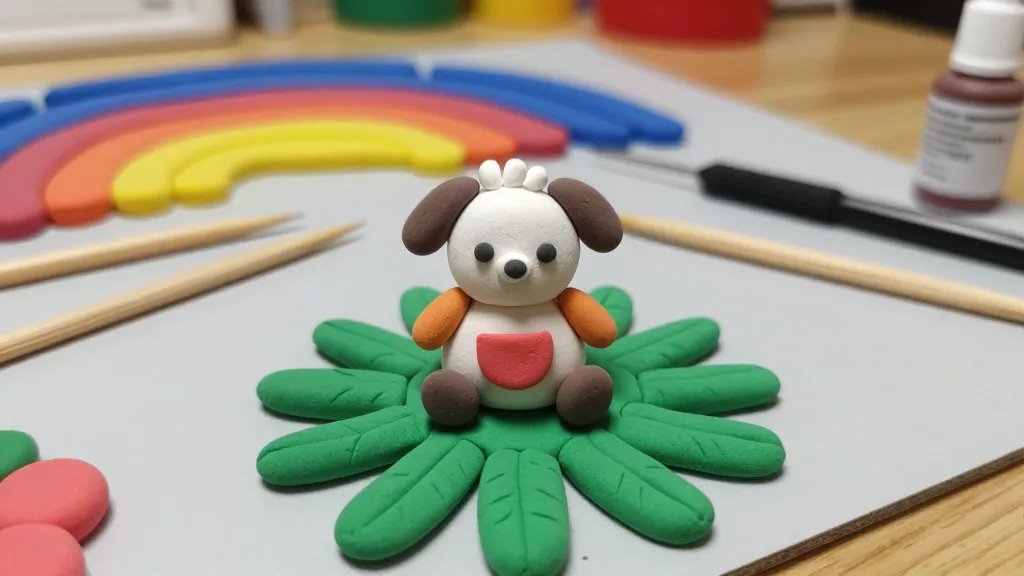
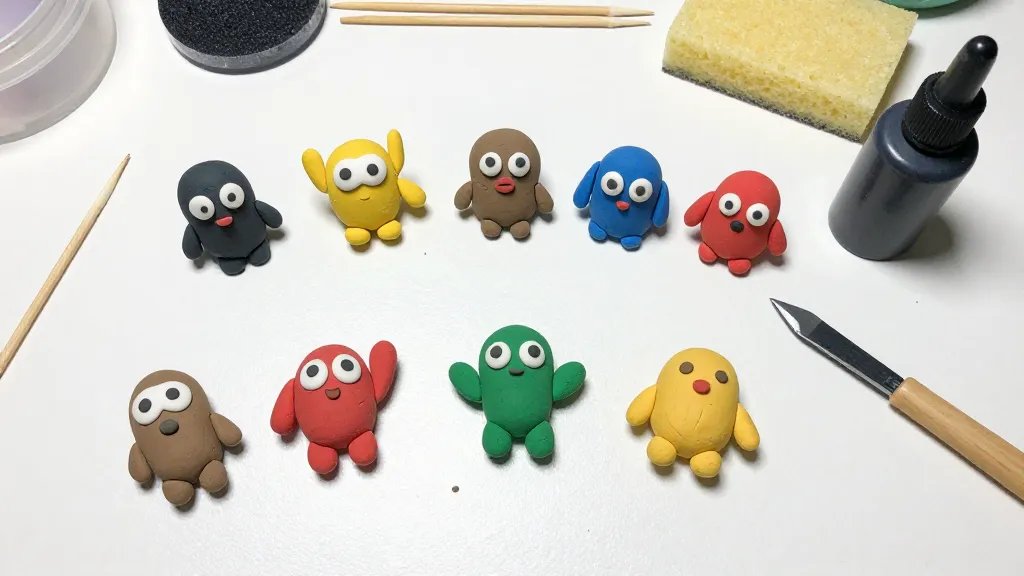
Step 2: Create Persona With Features
Small features give your mascot soul. Eyes, mouths, and distinctive marks set the tone. Decide early if you want cute, goofy, or quirky. The right expression can carry the whole piece.
Eyes And Expressions
– Simple black dots or tiny almond shapes work wonders.
– Place them slightly higher on the face for a friendlier look.
– A curved mouth can show delight; a tiny line can signal mischief.
Nose, Ears, And Other Accents
– Ears can be triangular, rounded, or leaf-shaped—whatever matches your character.
– A small nose or whiskers add personality without clutter.
– Accessories like a mini hat or scarf can elevate the vibe with zero extra fuss.
Step 3: Fine-Tune With Texture And Depth
Texture brings life. Smooth areas feel sleek; rough patches read character. Use your fingernail, a toothpick, or a soft brush to add texture without destroying the form.
- Imitate fur, scales, or fabric by light scraping or stippling.
- Indent tiny lines to imply clothing seams or fur direction.
- Blend seams gently so they disappear or become part of the character.
Depth Tricks
– Press a tiny amount of clay on the underside of limbs so they don’t detach during curing.
– For a glossy finish, a light scratch and sealant can pop the colors.
Step 4: Bake Or Air-Dry With Care
Follow your clay’s guidelines. Polymer clay bakes, air-dry clay cures, but neither appreciates a chaotic oven or humidity spike. Patience is your best friend here.
Polymer Clay Quick Bake Tips
– Preheat as directed and bake on a flat, heat-safe surface.
– Bake in short rounds if you’re building limbs that attach later. This avoids slumping.
– Let cool completely before handling to prevent fingerprints.
Air-Dry Clay Quick Tips
– Cover loosely with a breathable cloth during drying to prevent dust.
– Flip gently halfway through drying to prevent warping.
– Don’t rush—air-dry clays can take a day or two depending on thickness and humidity.
Step 5: Seal The Deal (Optional But Worth It)
A sealant protects color and gives a professional finish. Matte looks charming on mascots that feel cozy; gloss makes colors pop.
- Apply thin, even coats. Don’t flood the surface.
- Let each coat dry fully before adding another.
- Consider a UV-resistant spray if your mascots will live in sunlight or near windows.
Step 6: Add The Final Flourishes
Tiny embellishments make a big impact. Give your mascot a name tag, a tiny accessory, or a mini stand so it can perch proudly on your desk.
Quick Accessory Ideas
– Mini hat, scarf, or bow tie
– Tiny backpack or prop, like a pencil or a mini slice of pizza
– A pin-back backing so it can be stuck on a bag or jacket
Step 7: Display And Play
Your tiny mascots deserve a stage. Create a little display shelf, a rotating gallery in a jar, or a mobile with string and beads. The more you play, the sharper your eye becomes for scale and proportion.
Let Them Inspire New Creatures
– Use one mascot’s color palette to spur a whole squad.
– Experiment with different expressions on the same base shape to maintain consistency while exploring personality.
FAQs
What size should my tiny mascot be?
Most crafters aim for around 1 to 2 inches tall. It’s big enough to show details but small enough to carry easily. If you’re gifting, think about the recipient’s favorite color palette and hobbies to guide scale and style.
What clay works best for beginners?
Polymer clay is forgiving andCRIT fast to bake, which helps beginners see results quickly. Air-dry clay is great if you don’t want to bake. Pick whichever suits your environment and patience level. IMO, start with polymer for quick wins and then try air-dry for experimentation.
How do I fix a broken limb or seam?
Carve away a tiny piece of fresh clay to use as a patch, blend the edges, and smooth. If the piece is stubborn, attach with a dab of fresh clay and reshape once dry.
How long do these mascots last?
With proper sealing, a polymer clay mascot can last many years. Air-dry clays depend on humidity and handling. If you want longevity, add a sealant and store them away from direct sunlight.
Do I need tools beyond common household items?
Not really. A few basic tools make shaping easier, but you can replicate most effects with a toothpick, a small brush, and a smooth tile or plate as a base. You’ll likely collect more tools as you level up, but you can start lean.
Can I turn my mascot into a gift tag or keychain?
Absolutely. Add a drilled hole before baking for a keychain, or glue a small metal ring afterward. Just plan for extra weight so it doesn’t drag down the tag or keyring.
Conclusion
Tiny clay mascots are a joyful blend of planning and playful chaos. They reward you with tiny smiles and seriously satisfying results. Start with a simple shape, layer in personality, and don’t sweat the tiny mistakes—they’re part of the charm. FYI, the more you make, the better your instincts become at spotting what worked and what didn’t. Happy crafting!


