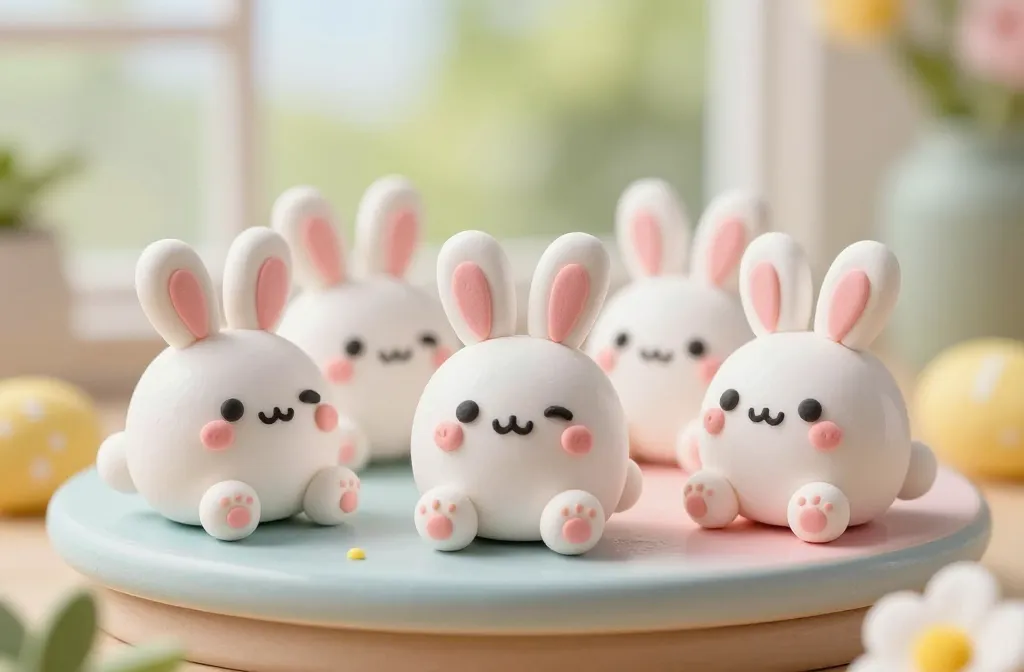
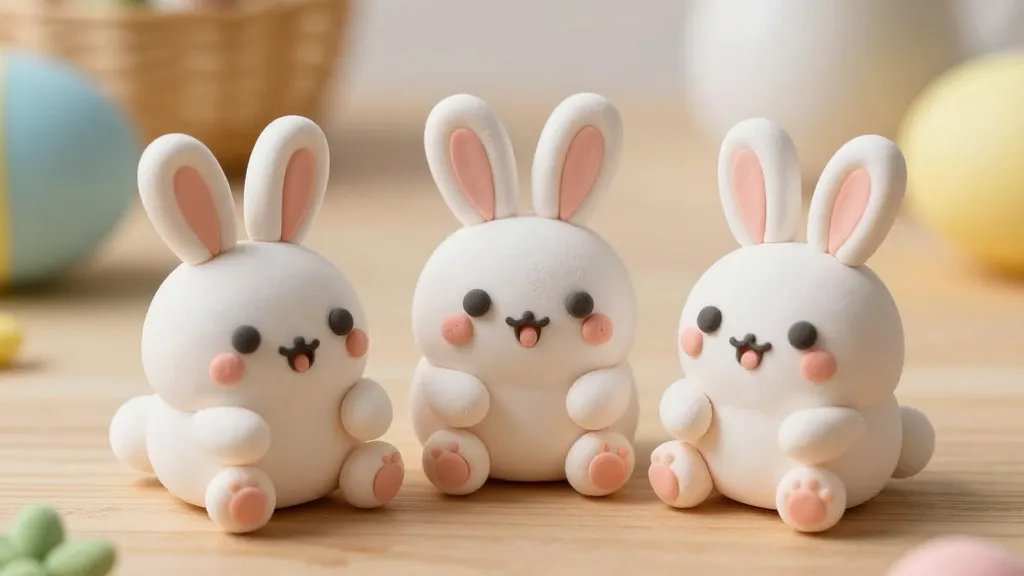
Ready for some handmade charm? Let’s dive into the world of kawaii Easter bunny figurines crafted from simple clay. These tiny pals aren’t just decorations—they’re tiny mood-boosters you can touch, customize, and proudly display. FYI, you might start a lifelong clay obsession after a single bunny bite.
Why Clay Bunnies Are The Low-Key MVP Of Easter Decor
Clay bunny figurines bring a tactile joy that plush or plastic just can’t match. You can shape them into goofy expressions or sweet, sleepy smiles. Plus, they’re incredibly forgiving for beginners and endlessly customizable for seasoned crafters.
Texture, Texture, Texture
Clay lets you play with fins, fluffy tails, and tiny paws that feel real in hand. A pinch here, a smoothing stroke there, and suddenly your bunny radiates personality. Wonder why yours look extra squishy? It’s mostly about the clay type and finishing touches.
Air-Dry vs Bake-Cure: The Quick D-I-Y Dilemma
Air-dry clay = fast and forgiving. Bake-cure clay = durability with a bit more rigidity. If you’re hosting an Easter crafts night, air-dry is the delightfully lazy option; bake-cure is ideal for a keepsake that lasts for years. IMO, start with air-dry and level up later.
Choosing The Right Clay For Your Cuddly Bunny
Your clay choice sets the vibe of your figurine. Do you want a squishy, soft look or a crisp, porcelain-like finish? Let’s break down the contenders and what they’re best at.
Polymer Clay Pros And Cons
- Dries hard when baked; sturdy enough for shelves.
- Vibrant colors, easy to blend, great for tiny details.
- Requires a dedicated oven and some ventilation—stay safe!
Air-Dry Clay: Quick, Messy, And Adorable
- Dip, poke, and shape without a heat source.
- Less crunchy after sealing; perfect for quick gifts.
- Primarily ideal for indoor displays where humidity isn’t wild.
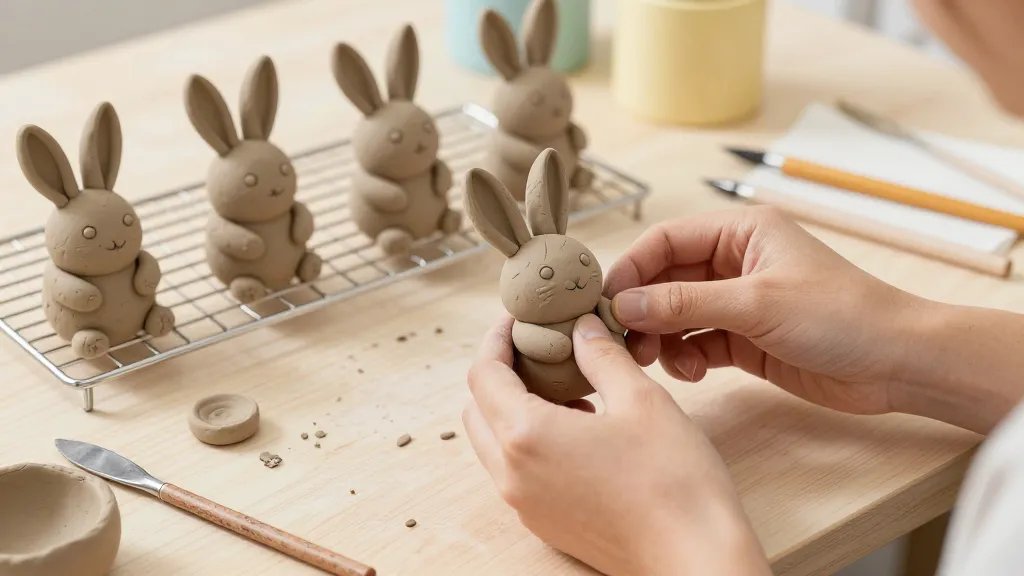
Designing Your Kawaii Bunny: A Step-By-Step Playbook
Let’s map out a simple process so you can crank out adorable bunnies without crying into your glue gun.
Sketch The Cuteness
Start with tiny sketches. Big ears? Tiny noses? The classic kawaii vibe often leans on oversized features that melt hearts. Sketching helps you lock proportions before you touch the clay.
Base Shape And Body Posture
Use a ball for the head and a teardrop or oval for the body. Attach with a dab of slip or water if you’re using polymer clay. Pose them sitting, standing, or mid-hop for different vibes.
Face It: Eyes, Nose, Mouth
Big round eyes and a tiny mouth say “friendly.” Draw with a fine tool or use tiny beads. Add blush with a soft pink pigment to give instant charm. Pro tip: tiny white highlights in the eyes make them look extra lively.
Finishing Touches: Fur, Tail, And Accessories
Details are everything in the kawaii world. They separate the “meh” bunnies from the “OMG I need one” bunnies.
The Fur Trick
Texture can be implied with gentle stippling or soft brush strokes. If you’re painting, you can add subtle fur lines with a fine brush to suggest fluff without going overboard.
The Tail: The Micro Star
A tiny cotton ball or a little puff of wool glued on the backside feels delightfully plush. It’s the kind of detail that makes friends ooh and aah when they see your display.
Accessories That Pop
- Mini carrots, flower crowns, or pastel ribbons to switch up the scene.
- Seasonal add-ons: Easter eggs, Easter baskets, or spring flowers.
- Base setups: a little grassy patch or a tiny picnic blanket to tell a story.
Color Palettes That Read “Kawaii”
Color choice is a mood-setter. Soft pastels feel classic, but bold accents can make your bunny genuinely Instagram-worthy.
Pastel Perfection
Opt for pale pinks, baby blues, mint greens, and lavender. A gentle wash on the cheeks adds instant charm. FYI, keep colors slightly desaturated for that modern kawaii vibe.
Pop Of Color For Contrast
Tiny accents in coral or sunny yellow draw the eye without overpowering the cuteness. Pro move: reserve bold tones for accessories rather than the main bunny body.
Sealing And Preserving Your Mini Masterpieces
You’ve poured love into these bunnies—now protect it. The right sealant keeps colors vibrant and surfaces smooth, so your figurines survive shelves, pet hair, and curious kids.
Sealing For Polymer Clay
Use a glaze or a varnish designed for polymer clay. Apply in thin layers, allowing each coat to cure fully. Build up a satin or matte finish, depending on the look you’re chasing.
Sealing For Air-Dry Clay
Acrylic sealer works well here. Go with a matte finish for a soft, cozy feel, or a satin finish if you want a touch more life and brightness.
DIY Gift Ideas And Display Ideas
Clay bunnies make fantastic, personal gifts. They’re unique, thoughtful, and you can tailor them to the recipient’s color palette or interests. And yes, they look adorable on desks, shelves, or as a cute centerpiece.
Gift Ideas
- A bunny with a tiny painted message card for graduation, birthdays, or “just because.”
- A themed Easter basket with several bunnies doing silly poses.
- A bunny couple or family set to celebrate, say, a new baby or wedding.
Display Ideas That Spark Joy
- Line a bookshelf with a little garden scene and a trio of bunnies.
- Create a tiny spring diorama using moss, faux flowers, and gentle lighting.
- Use a shallow tray to ground the scene with decorative pebbles and mini eggs.
Common Mistakes To Avoid (And How To Fix Them)
We’ve all learned the hard way. Here are the slips you’ll thank yourself for avoiding later.
Overworking The Clay
Touch it too much, and you’ll squish the shape or create fingerprints all over. Gentle shaping wins the day—imagine you’re a calm sculptor, not a stress-ball.
Skipping The Prep Work
Failing to condition your clay or prime your surface leads to cracks or dull finishes. Knead, condition, and plan before you start animating your bunny’s personality.
Neglecting The Sealant
Without proper sealing, colors fade and pieces become brittle. Sealants are your best friends, so don’t skip them if you want long-lasting cuteness.
FAQ
Can beginners really make kawaii Easter bunny figurines from clay?
Absolutely. Start with air-dry clay for quick wins and forgiving mistakes. As you gain confidence, you can experiment with polymer clay and baking techniques. The key is to have fun and not overthink every little detail.
What tools do I need to get started?
Keep it simple: a sculpting tool set, a baking surface or mat, craft glue, acrylic paints, a fine brush, and a sealant. Optional but amazing: tiny cookie cutters for ears and paws to speed up shaping.
How do I prevent cracking in air-dry clay?
Condition the clay well, use gentle pressure, and avoid drying too quickly in drafts or direct sunlight. If a crack shows up, a little slip and smoothing with your fingertip can fix it before it fully dries.
What finishing touches make a bunny look extra kawaii?
Big, shiny eyes with tiny highlights, a soft blush on the cheeks, and a fluffy tail. A little accessory like a pastel bow or hat also amps up the cuteness without stealing the spotlight from the bunny’s face.
How should I display a set of bunnies?
Group them in a gentle arc on a shelf, or place them in a mini diorama. Vary their heights with small stands or corks to create visual interest. And yes, take pictures—these tiny pals deserve a feed-friendly moment.
Conclusion
Kawaii Easter bunny figurines made from clay are the delightfully quirky project that pays you back with smiles, not just shelves full of dust collectors. They’re accessible to beginners, endlessly customizable, and oddly soothing to create. So grab some clay, a dash of whimsy, and start crafting your own springtime squad—the world could use a little more handmade joy. IMO, you’ll end up with a tiny army of cuteness that makes every Easter feel extra special.


