An egg-cellent spin on Easter that’s way more fun than a plasticky egg hunt. Let’s get crafty with farm-fresh charm, adorable animals, and zero boring vibes. You’ll walk away with projects that impress the grandkids and maybe even your skeptical DIY club.
Farmyard Friends You Can Craft Today
You don’t need to be Picasso to pull off these critter crafts. Start with simple shapes, then level up as you gain confidence. FYI, the cuter the face, the bigger the smiles.
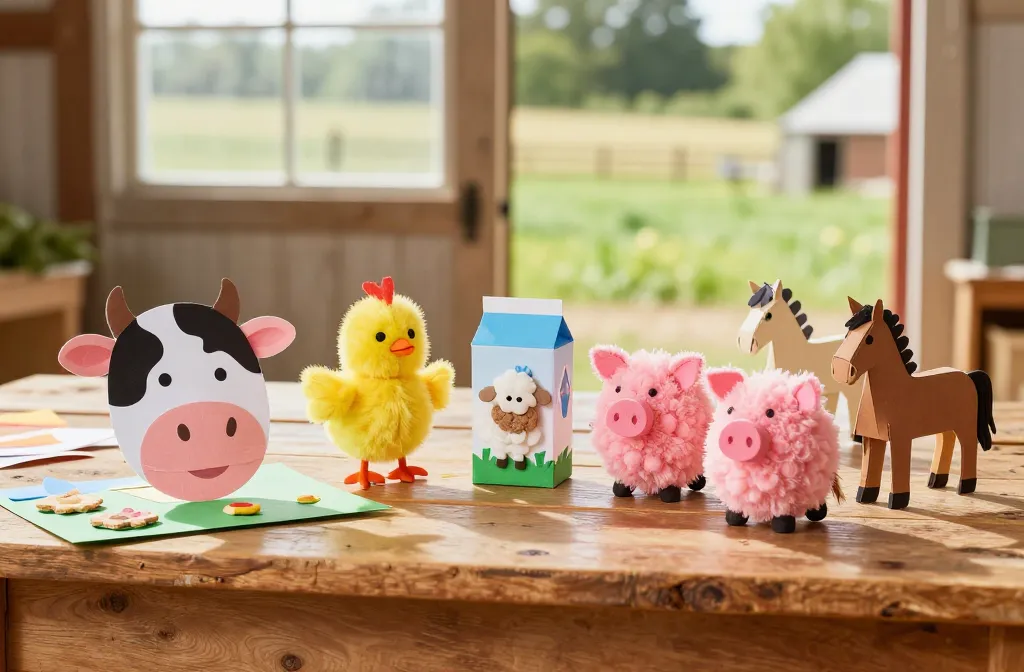
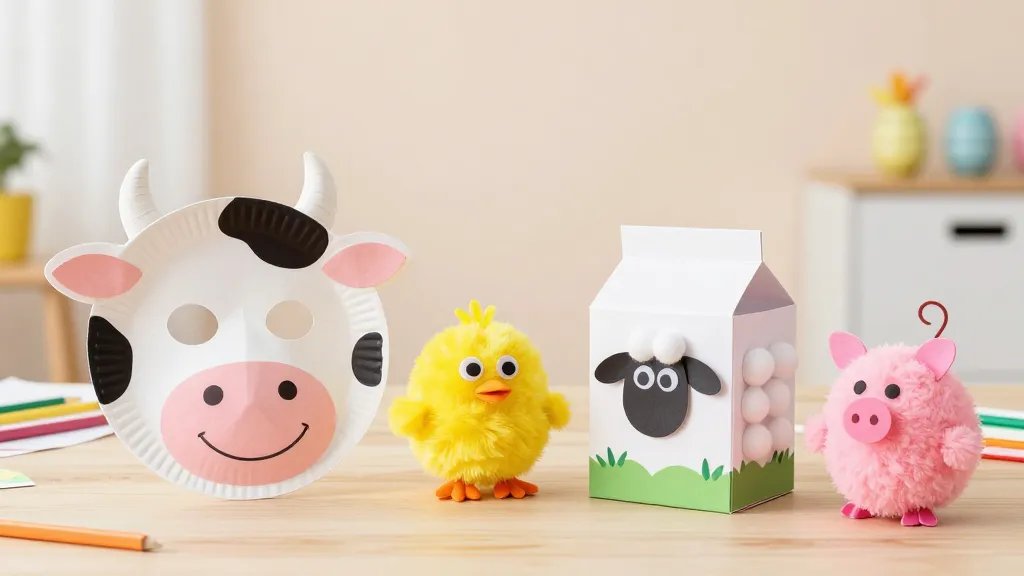
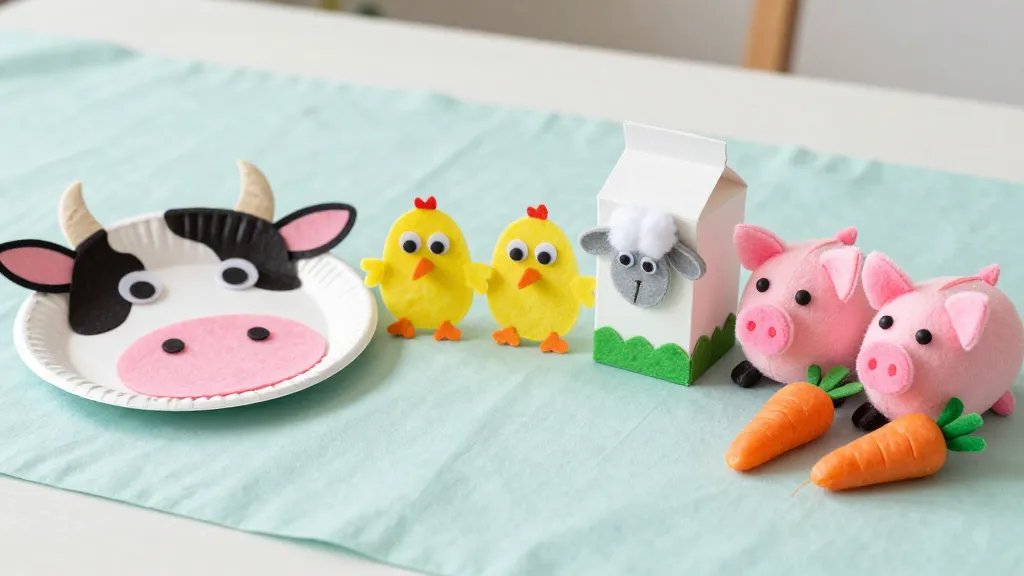
- Paper Plate Cow Mask — white plate, black spots, and a friendly moo. Easy peasy and surprisingly expressive.
- Puffy Chick Puppets — yellow felt, orange beaks, and a dash of googly eyes. Instant sunshine.
- Milk Carton Sheep Treat Boxes — reuse a carton, add cotton balls, and a shy little bleat becomes a delightfully tactile snack holder.
- Pom-Pom Piggies — pink pompoms, ears, and a curling tail. Squeal-worthy in a totally adorable way.
- Egg Carton Farm Animals — cut, paint, and puff up with yarn manes for horses and sheep alike.
Materials Hack: Budget-Friendly Tools That Do the Job
Crafting doesn’t have to break the bank. Use what you already have, and get creative with substitutes. Think thrifty, not frugal in a sad way.
Everyday Items That Pull Weight
– Cardboard tubes, toilet paper rolls, and egg cartons turn into a barnyard wonderland.
– Felt scraps, googly eyes, and pipe cleaners bring characters to life without needing a fancy shop.
– Paint, markers, and glue—oh my—cover color basics and let your imagination roam.
Smart Substitutions
– Use fabric scraps in place of felt for a textured look.
– Cotton balls = fluffy sheep, cotton swabs = tiny hay bales.
– Reuse ribbon scraps for bows or little farmer accents. The environment will thank you.
Step-by-Step Sampler: Quick Projects for Busy Crafters
Short on time? No problem. Here are quick, crowd-pleasing projects with fast turnaround.
1) Paper Plate Cow Mask
– Paint the plate white, add black spots, and draw ears on a separate piece of paper. Glue them on.
– Cut out a hole for the eyes and a string at the back. Toss on a goofy grin and you’re done.
– Tip: Use a washable marker for easy corrections.
2) Cheery Chick Puppets
– Cut a teardrop shape from yellow felt.
– Attach orange beak and two eyes with glue.
– Add a small popsicle stick as a handle. Wave hello to your audience!
3) Sheep Treat Box from a Milk Carton
– Rinse and dry a cardboard milk carton. Paint white and glue cotton balls all over for a fluffy coat.
– Create a tiny mouth and eyes with a black marker, and tuck in a few treats for a brag-worthy reveal.
Techniques That Make It Look Pro (Even If You Are Not)
A few tricks can elevate your crafts from cute to “contest-winning.”
Blending and Layering
– Layer colors slowly to avoid muddy mixtures. Build depth by adding light shades first, then darker edges.
– Use a damp brush to softly blend edges on animal faces for a friendly vibe.
Texture Wins
– Add texture with yarn manes, felt fur, or fuzzy pom-poms. Textures invite touch and bigger smiles.
– Experiment with burlap for barns or hay stacks to ground your scene.
Decor Ideas: Turning Crafts Into Seasonal Decor
Your farm animals aren’t just for the table; they can beautify your space too.
Table Centerpieces
– Create a mini scene in a shallow tray using painted cardboard, cotton, and tiny props.
– Sprinkle faux eggs and a few straw sprigs to complete the farm vibe.
Wall Garlands
– String small farm animal silhouettes along a twine line. Clip on a few painted eggs for a festive touch.
– Double-duty tip: make a seasonal banner that says “Happy Easter” with your critters as the stars.
Kid Involvement: Craft-Time With The Smallest Helpers
Crafting with kids adds chaos but also huge laughs. Here are tips to keep it fun and mess-friendly.
- Set up a dedicated craft station with a drop cloth and labeled bins.
- Label materials by color or type so little hands can grab what they need quickly.
- Offer choices to empower decision-making: “Do you want a cow or a chick today?”
Safety First
– Use non-toxic paints and washable glue.
– Supervise small pieces that could be choking hazards.
– Keep scissors kid-friendly and stored away when not in use.
Audience-First: Sharing Your Creations Online
If you’re into showing off your work (and who isn’t), a few formatting tips boost engagement.
Photographing Your Craft
– Move to natural light, avoid harsh shadows.
– Close-ups of textures (cotton, felt, yarn) add personality.
– Include a full-shot and a bright, simple background.
Caption Magic
– Keep it breezy and personal: “My little farm crew is ready for Easter!”
– Use a couple of popular emojis to hint at the theme without overwhelming the post.
– FYI, asking a question in the caption increases comments.
FAQ
What age group are these crafts best for?
These projects suit toddlers to older kids with supervision. Adapt the details to fit your group. For younger kids, keep shapes simple and let them place stickers or yarn.
Can I use recycled materials only?
Absolutely. Milk cartons, cardboard, and paper plates work beautifully. Reuse anything you’d otherwise throw away.
How long do these projects take?
Most simple crafts take 15–30 minutes per item. If you’re making multiple pieces, schedule a little longer and break it into stations.
What if I’m not great at drawing faces?
Simplify. Perfect circles are not required. A few dot eyes and a tiny smile still has huge impact. You can also pre-cut eyes from googly eyes for consistency.
How can I store finished crafts for display?
Place them on a flat surface or hang them with string. If you plan to store for a while, consider a thin coat of clear spray to preserve colors and prevent fraying.
Conclusion
There you have it—a farmyard full of Easter crafts that are easy, cute, and surprisingly satisfying. Whether you’re DIY-ing with kids or just looking for a quirky centerpiece, these projects deliver charm without the chaos. So grab some supplies, recruit a friend or two, and get ready to moo-ve into a season of playful creativity. Happy crafting, and may your Easter barn be the coolest thing in the neighborhood.


