
An Easter bunny garland is the kind of project that asks for two things: cute vibes and zero drama. You’ll transform a plain space into a playful springtime nook in a weekend. Grab some coffee, and let’s make something that’ll make the Easter bunny jealous.
Why a Bunny Garland, Not Just Bunnies Stuck on a String
Garlands bring whimsy without shouting. They can wrap a mantel, staircase, or doorway with personality. Plus, you can reuse it year after year with minimal tweaks. FYI, DIY garlands also let you control color, texture, and size—no more hunt-and-peck shopping for the “perfect” Easter decor.
Materials You’ll Need (Keep It Simple)
- Cardstock, felt, or lightweight foam in pastel colors
- Wire twine or baker’s string
- Scissors, glue, and a hot glue gun if you’re feeling extra
- Templates for bunny shapes (printable or hand-drawn)
- Optional: markers, pom-poms, googly eyes, ribbon, yarn
No need to raid the craft store for every tiny thing. Start with what you already have at home, and improvise like a pro. FYI, the lighter the material, the easier the garland will be to hang and store.
Step-by-Step: How to Cut and Assemble
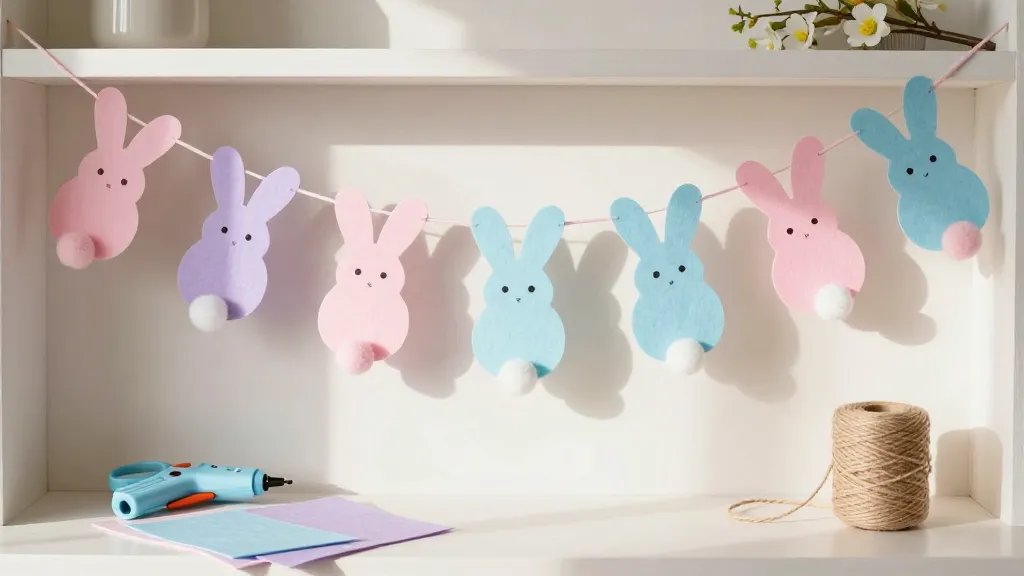
- Choose your bunny style: cute, minimalist, or a goofy side-eye. Pick a template that matches your vibe.
- Trace or print the bunnies onto your material. If you’re using felt, cut twice for each bunny for a plush look.
- Decorate each bunny before sealing: add cheeks, eyes, tiny bows, or a little carrot idea with orange felt.
- Attach bunnies to the string with a small dot of glue or by punching holes and threading the twine through.
- Space them evenly. If you want a more dynamic look, stagger the bunnies along the line rather than keeping them perfectly lined up.
Templates, Themes, and Quick Variations
Minimalist Pastel Bunnies
Two simple shapes, soft colors, and clean lines. This works great for a modern home that still loves Easter vibes. Use white bunnies on pale pink or mint twine for a subtle effect.
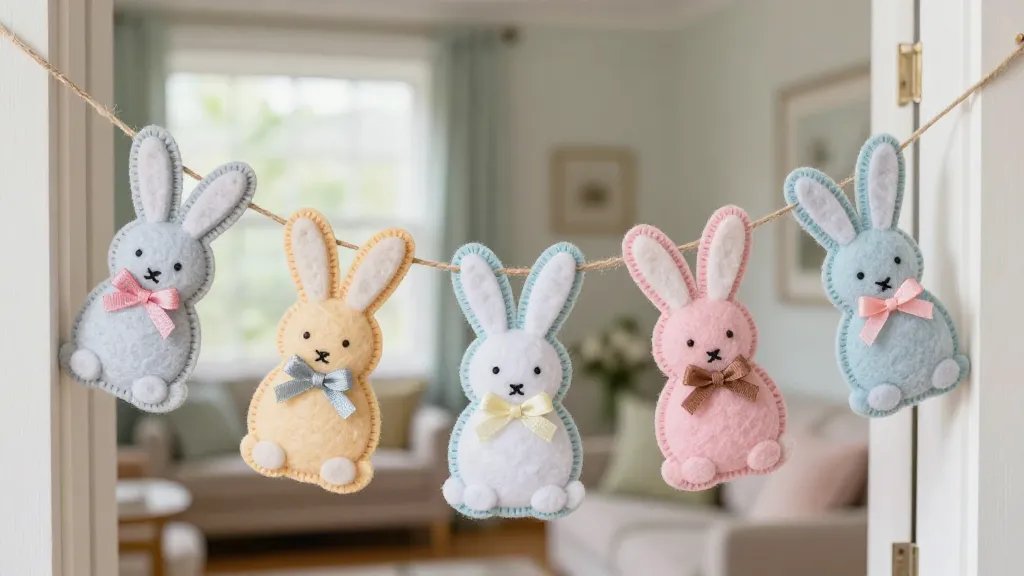
Whimsical Faces with a Punch
Give each bunny a tiny personality. A wink, a surprised look, or a sleepy smile can make your garland feel alive. Pro tip: tiny felt cheeks + tiny black eyes go a long way.
Textured Twine and Natural Elements
Swap out flat materials for textured options like burlap, linen, or craft paper. Add dried flowers or small wooden carrots for an earthy touch. It’s FYI-friendly and a little chic.
Pro Tips for a Look That Pops
- Scale matters: Alternate large and small bunnies to create rhythm. Don’t cram everything at one end—that reads crowded.
- Color coordination: Stick to 2–3 complementary colors. If you want a bold look, go for high-contrast combos like soft gray bunnies with coral ribbons.
- Seamless hanging: Use a thin command-hook or a removable adhesive to avoid wall damage. Thread the twine behind a curtain rod for a hidden mount.
Interactive Fun: Making It a Family Project
Turn this into a mini craft party. Let kids draw their own bunnies, pick colors, and help with gluing. It’s a perfect way to spend a weekend afternoon and show off a collaborative display on Easter weekend.
Kid-Friendly Design Tricks
Use pre-cut bunny shapes, safety scissors, and washable markers. Add a few sticker eyes for a no-muss option. The goal is to keep it fun and low-stress.
Storage and Longevity: Keep the Garland for Next Year
- Store in a breathable container to avoid moisture damage. A large zip-top bag with tissue paper works in a pinch.
- Detach the bunnies from the string before storing if space is tight. Re-assemble next year with minimal effort.
- Label the box with the year and colors to make seasonal re-use even easier.
Creative Add-Ons to Elevate Your Garland
- Ribbons tied to the string between bunnies for extra flair
- Small carrot cutouts made from orange felt or paper
- Glittery accents or metallic outlines for a festive sparkle
FAQ
Do I need fancy tools to make this garland?
Not at all. Paper, felt, scissors, and glue do the job. A hot glue gun speeds things up but isn’t mandatory. FYI, a craft knife helps if you’re cutting intricate shapes, but be careful—danger toes are a bad party trick.
What colors look best for a spring vibe?
Soft pastels are the classic choice: mint, blush pink, pale yellow, lavender. If you want a modern twist, pair with a pop of coral or navy. The key is balance—three colors max for a cohesive look.
How long does it take to make?
Plan 60–120 minutes, depending on how detailed you go. If you’re hosting a craft night, break it into two sessions. Pro tip: prep pieces ahead of time to avoid a last-minute rush.
Can I customize this for other holidays?
Absolutely. Swap out bunny shapes for hearts, pumpkins, or stars. Use seasonal colors and add small elements like mini garlands or ribbons. It’s basically a craft chameleon that hides in your decor closet until you call it up.
How should I hang the garland for the best effect?
Hang at eye level where it can be appreciated. If you’re draping over doors or mantels, make sure the knots or attachment points are secure but removable. A gentle sway as guests walk by adds charm without looking messy.
Final Flourish: Making It Your Own
Trust your taste. If you love a bold, goofy bunny with oversized ears, roll with it. If you prefer a delicate, almost minimal look, scale back the details. The beauty of a DIY garland is that you control every inch of it. And yes, it’s totally okay to brag a little when guests ask where you got that adorable Easter setup.
Conclusion
This Easter bunny garland DIY is a simple, joyful project that pays off in big smiles. It’s affordable, easy to customize, and a breeze to store. So grab your scissors, pick a color story, and get ready to talk in a slightly higher-pitched voice about your cute, crafty creation. IMO, you’ll want to keep this hanging well into spring—because happiness has a funny way of staying put.


