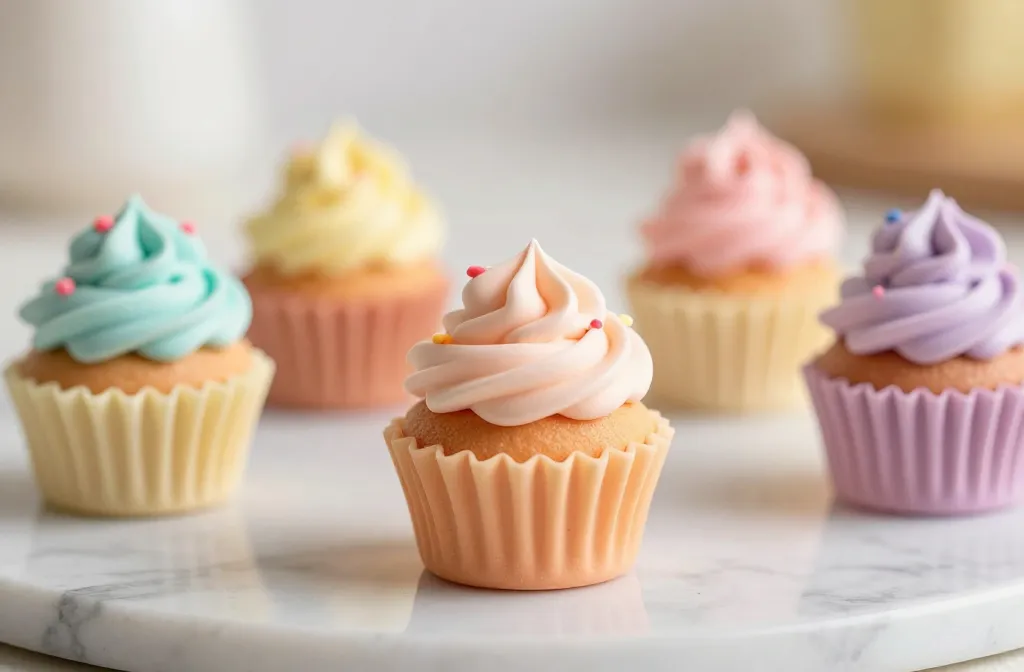
Mini clay cupcakes that look real? Yes, please. These little charms are the kind of DIY project that makes you feel like a kitchen wizard without the calories. Grab your clay, some patience, and a dash of whimsy—we’re about to turn a simple lump of clay into dessert twin magic.
Why Realism Matters in Mini Clay Cupcakes
Tiny is tricky. The smaller the cupcake, the easier the illusion breaks. Realism matters because realistic texture, color, and tiny details sell the illusion. Do you want them to scream “I’m edible-looking” or quietly whisper “I’m art”? If you’re aiming for the former, you’re in the right mood for a little sculpting mischief.
Materials You’ll Need (No Studio Required)
- Polymer clay in soft pastel colors
- Clay roller and blade for clean edges
- Fine-grit sandpaper for smoothing
- Acrylic paints for shading and tiny sprinkles
- Gloss varnish or resin for a glaze
- Toothpicks or fine brushes for details
- Needle tool or pin for tiny texture
FYI, you don’t need a fancy kiln if you’re using oven-bake polymer clay. Tempting, I know. Just follow the packaging directions and bake in a household oven. No drama, just science and a little patience.
Step-by-Step: Crafting the Base Cupcake

- Roll a small ball of clay for the cake base. Gently flatten to form a shallow cup shape.
- Push a tiny cone into the center to mimic a cupcake rise without making it too pointy.
- Smooth the edges with a soft tool; no harsh lines, please.
- Bake according to the clay’s instructions and let it cool fully before painting.
Texture Tricks That Sell Realism
Texture is the magic word. Use a clean needle tool to add micro-dots on the surface to imitate sponge cake. A quick brush of fine sandpaper gives a velvet finish that reads as “freshly baked” in miniature form.
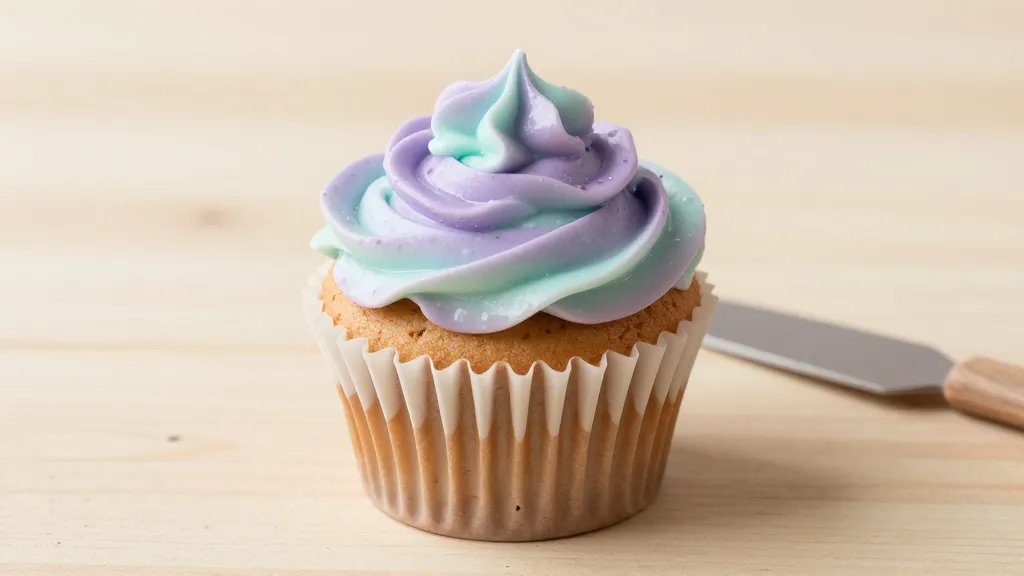
Frosting that Looks Delicious (Even If It Isn’t)
- Choose a base color close to real frosting—think soft pink, vanilla white, or minty green.
- Apply a slightly thicker layer to mimic whipped frosting. You want a soft, fluffy ridge on top.
- For a glossy glaze, mix a drop of gloss varnish with a touch of resin and brush over the frosting after it dries.
Color Play: Shadows and Highlights
Shading is your best friend. Add a dab of darker shade at the base of the frosting and a lighter touch at the peaks. This creates depth and makes those tiny curves pop. IMO, the right lighting brings out the realism more than any brushstroke.
Toppers, Sprinkles, and Tiny Details
- Sprinkles: Use tiny seed beads or crushed pearl pigments mixed with a clear glaze. Tiny dots become a confetti of color.
- Fruit accents: A miniature strawberry slice or a blueberry made from clay adds realism and whimsy.
- Leaves and flowers: A small fondant-like leaf on top can look adorable and realistic if shaded properly.
Stability and Finish for Longevity
Seal everything with a thin gloss coat or resin. It protects colors and adds that bakery-perfect shine. FYI, test a small area first to ensure the glaze doesn’t craze or crack with your climate.
Display Ideas That Make Your Mini Cupcakes Shine
- Mini cake stands: Clear acrylics give an “I’m gallery-ready” vibe.
- Shadow boxes: Line a tiny tray with decorative paper and place cupcakes with a sprinkle of faux sugar on the glass.
- Themed setups: Seasonal colors or a “bakery counter” scene can turn your collection into a mini showpiece.
Common Mistakes and How to Avoid Them
- Overworking the clay: It dulls the surface. Keep your movements light and quick for a smoother finish.
- Ignoring bake times: Burnt clay is not cute. Set a timer and follow the package directions.
- Skipping sealing: Your colors will fade with sun and time. A gloss seal is your friend.
Frequently Asked: Practical Tips and Snappy Answers
How small can these get before they lose charm?
The magic tends to disappear if you go too tiny. Aim for realistic micro-cakes around the size of a pea to a marble. If it fits in your palm, you’re in a good range.
Can I mix real food colors with clay?
Stick to clay pigments for best results. Food coloring can stain or cause unpredictable reactions. FYI, acrylic paints and clay are your safer, longer-lasting friends.
What’s the best way to fix a warp or bend after baking?
Lightly sand the surface once cooled and re-bake for a short time if needed. If it’s a major warp, gently reshape with your fingers while the clay is still pliable, then re-seal after it cools.
How do I prevent fingerprints on the final piece?
Work with clean hands, keep tools dust-free, and apply a gloss sealant in a dust-free environment. A micro-fiber cloth afterward helps remove any lingering prints.
Are resin glazes safe for kids or beginners?
Resin can be tricky and requires ventilation. If you’re new, opt for a standard gloss varnish first. IMO, it’s less stressful and still gives you that glossy finish.
Seasonal Tweaks and Personal Touches
Want to tailor your mini cupcakes to holidays or events? Change the frosting colors, add seasonal toppers, or create themed sets. A Halloween batch with orange frosting and black sprinkles can be terrifyingly cute; a spring set with pastel shades and tiny flower toppers feels like a breath of fresh air. The possibilities are endless, and yes, that’s the point.
FAQ Recap
What’s the easiest starter kit for beginners?
Grab a basic polymer clay set in a few colors, a roller, a blade, some bake-safe varnish, and a tray. You’ll have everything you need to start baking tiny masterpieces without breaking the bank.
How long do these typically last on display?
Colder, darker environments help. If you sealed them well, they’ll stay vibrant for months. If you want to rotate displays, that keeps things fresh and lets you enjoy new color combos.
Do I need a kiln for polymer clay?
Nope. Most oven-bake clays cure in your regular kitchen oven. Just follow the instructions on the package and keep a careful eye on baking times.
How can I photograph my mini cupcakes like a pro?
Natural light is your friend. Use a clean background, a shallow depth of field, and a small reflector to brighten the frosting tops. A white card can help bounce light and reduce shadows. FYI, editing can enhance detail, but avoid overdoing it.
Conclusion
If you’re chasing that “these look real, but they’re not” effect, you’re in the right hobby lane. Tiny details, patient shading, and a glossy finish give real cupcakes a tiny run for their money. Grab your clay, unleash your inner pastry artist, and prepare to wow friends with edible-looking art—minus the calories and the oven clean-up.


