Air-dry clay or polymer clay? If you’re chasing adorable DIYs without oven trips or messy pigments, you’re in the right inbox. Let’s break down which clay vibe suits your creativity, budget, and schedule—so you can craft your cutest minis without tears (or cracking).
What Makes Each Clay Type Stand Out
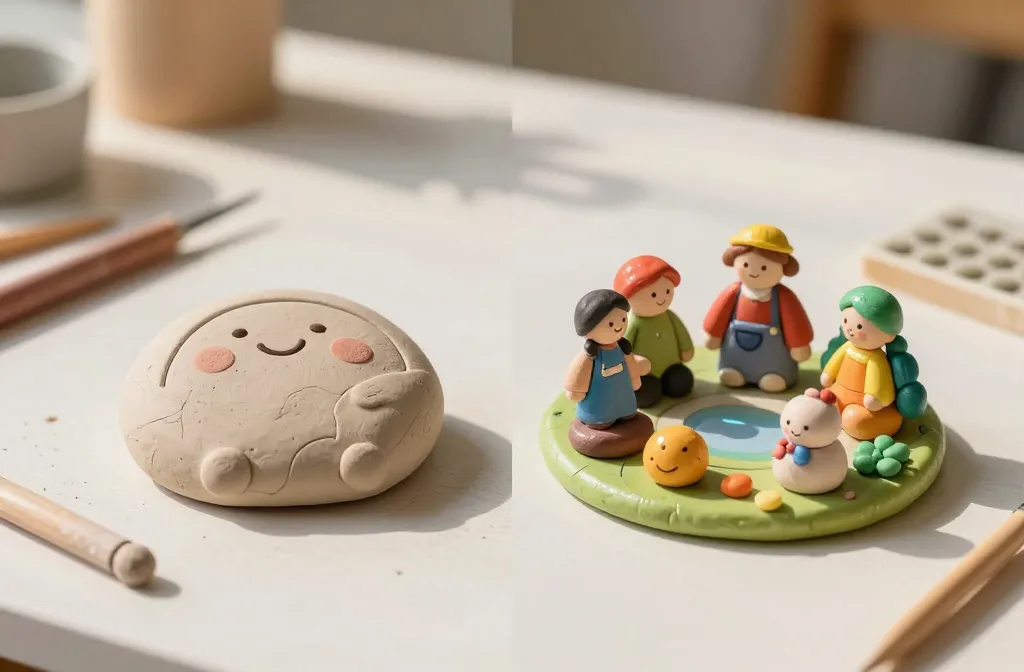
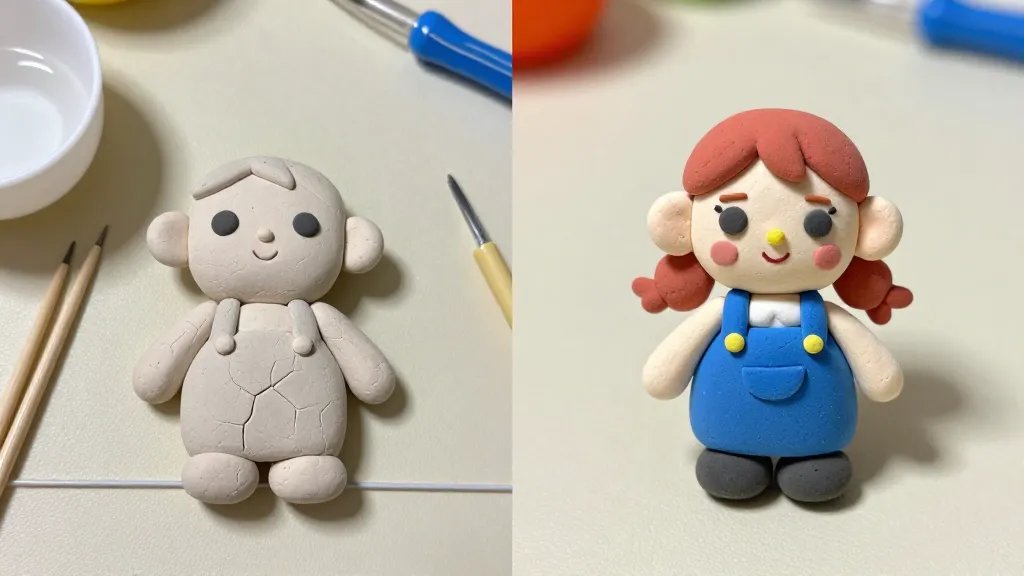
– Air-dry clay: soft, forgiving, and ready to do its thing in the open air. No oven needed, just a little time and patience.
– Polymer clay: sculpt with precision, bake to set, and snap-cure your masterpieces in a hot little oven moment. It’s like magic, but with instructions.
Air-Dry Clay: Pros and Cons
- Pros: simple to start, great for kids, captures detail, no heat risk, easy cleanup.
- Cons: dries hard and can crack if not hydrated, takes longer to cure, paint adherence can be finicky.
Polymer Clay: Pros and Cons
- Pros: strong once cured, tiny details pop, endless color mixing, durable for everyday handling.
- Cons: needs an oven, fumes can be a vibe killer if you’re not careful, can be pricey per small piece.
Scenarios Where Air-Dry Wins
– Quick tests and practice runs: you want a tiny character to poke at your mood board, not a life commitment.
– Kid-friendly crafts: soft, pliable, and easy to reshape with minimal mess.
– Texture experiments: smooth surfaces, fingerprint accents, and gentle sanding after drying.
When Polymer Clay Shines Bright

– Delicate miniatures: tiny facial features, eyes, and rims stay crisp after baking.
– Jewelry and wearables: baked hardness handles wear and tear, plus you can varnish for gloss.
– Color control: you can mix and match a rainbow without worrying about drying time warps.
Texture and Finish: A Quick Comparison
– Air-dry clay textures beautifully with patience. It accepts paint well, but you might see micro-cracks if it dries unevenly.
– Polymer clay keeps its shape during shaping and baking, so you get clean lines and smooth surfaces—great for kawaii faces and clean edges.
Tools, Supplies, and Budget Stuff
– Air-dry clay basics: set of basic tools, a splash of water, a plastic mat, and a little patience for drying. Optional: acrylics for paint after it dries.
– Polymer clay basics: a dedicated oven, a clay conditioning tool, blades for trimming, and glazes or varnishes for finishing.
– Cost check: air-dry is typically cheaper upfront, while polymer clay buys you durability and crisp detail—but add up the oven electricity and glaze costs over time.
Care and Craft Hygiene
– Clean nails and a tidy workspace help you dodge tiny clay flecks stuck in the fridge—yes, that happens.
– Store unused clay in airtight containers to keep it pliable; air-dry won’t last forever if you leave it exposed.
Project Ideas That Prove Both Clay Types Are Cute Killers
– Air-dry idea: a mini plant pot with a goofy face, or a set of starry charms for a bracelet.
– Polymer idea: a tiny bento box with hinged lid, or an adorable animal emoji keychain with glossy eyes.
How to Decide Fast: A Quick Pick Checklist
- Do you hate firing ovens? Go air-dry for starters.
- Do you crave tiny, durable details? Polymer wins hands down.
- Are you crafting with kids? Air-dry is simpler and safer for little hands.
- Is color control important? Polymer offers more predictable results when mixed.
Maintenance and Longevity: Keeping Your Creations Fresh
– Air-dry pieces should stay away from high humidity and direct sun to avoid softening or warping.
– Polymer pieces love a glaze or varnish for extra protection and gloss; it also helps seal in color.
Storage Secrets for Your Clay Studio
– Keep air-dry clay in sealed containers, away from moisture.
– Store polymer clay scraps in resealable bags separated by color family to avoid color bleeding.
Common Pitfalls and Snappy Fixes
– Air-dry cracking: rub in a bit of water and re-knead, then wrap to slow the drying process a touch.
– Polymer browning or scorching: bake at the recommended temperature and time, using a dedicated toaster oven if possible; avoid overbaking.
– Paint peeling: seal air-dry pieces with a clear sealant after paint dries to improve adhesion.
Common Question: Can I Use the Same Tools?
– Mostly yes, but polymer clay benefits from sharper blades and fine-detail tools due to its firm texture after baking.
– For air-dry, softer tools and a bit of patience help you avoid denting the surface.
FAQ: Quick Answers to Your Burning Clay Questions
Are air-dry and polymer clay food-safe after painting?
Most basics aren’t inherently food-safe, especially after painting or finishing. If you plan to use items with food contact, seal thoroughly and consider using them as decor rather than eating from them. FYI, always check the product labels for safety notes.
Is there a beginner-friendly project to start with?
Yes! Try a simple air-dry clay fridge magnet or a polymer clay bead pendant. Both teach you how to work with texture and shape without feeling overwhelmed.
Which clay dries faster?
Air-dry clay dries on its own, which means time depends on thickness and humidity. Polymer clay bakes in minutes, so you get a quick payoff and fewer patience complaints.
Can I paint clay before it dries?
Air-dry clay takes paint well after some initial drying; a light sealant helps. Polymer clay paints sit nicely too, but you’ll often glaze to keep colors vivid.
Do I need special varnish for polymer clay?
A dedicated polymer clay glaze or varnish helps protect the surface and adds shine. For matte looks, a satin finish works well and keeps it friendly for daily handling.
Final Thoughts: The Cute-Crafts Verdict
Air-dry clay and polymer clay both unlock adorable possibilities, so choose based on your vibe and schedule. Could you start with air-dry to test the waters and then graduate to polymer for tiny details? Definitely. IMO, layering projects with both clays creates a playful mix—you get the ease of air-dry and the durability of polymer for your best mini creations.
If you’re chasing instant cute wins, go air-dry for quick practice runs and larger, forgiving shapes. For show-stoppers and durable keepsakes, polymer clay delivers crisp lines and lasting finish. FYI, you don’t have to pick one and stick with it forever; many crafters blend the two approaches to suit each project.
So grab your tools, pick a project, and start crafting. Your future collection of charming critters and kawaii trinkets awaits—and yes, you’ll probably end up stealing a few spare minutes to hype yourself on social with those tiny masterpieces. Happy crafting, friend!


