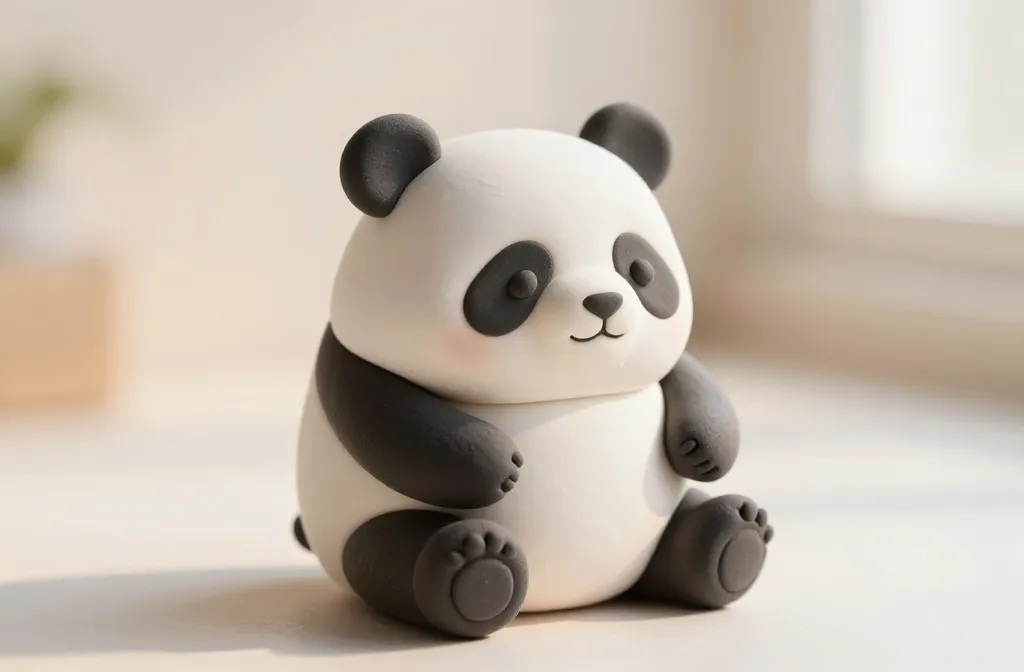
A tiny panda can steal the show in any room—trust me, I’ve seen it happen. If you love tactile, goofy little projects, you’re about to level up your desk game. Grab some clay, a smile, and your favorite playlist; we’re making a chunky, adorable panda in no time.
Why a mini clay panda?
You still here? Good. Mini clay pandas are the perfect shortcut to beginner-friendly crafting that looks impressively polished. They’re compact, forgiving, and practically begging for display spots—shelves, laptops, plant pots, you name it. FYI, the charm is in the tiny details: the black patches, the tiny ears, and the smug little grin.
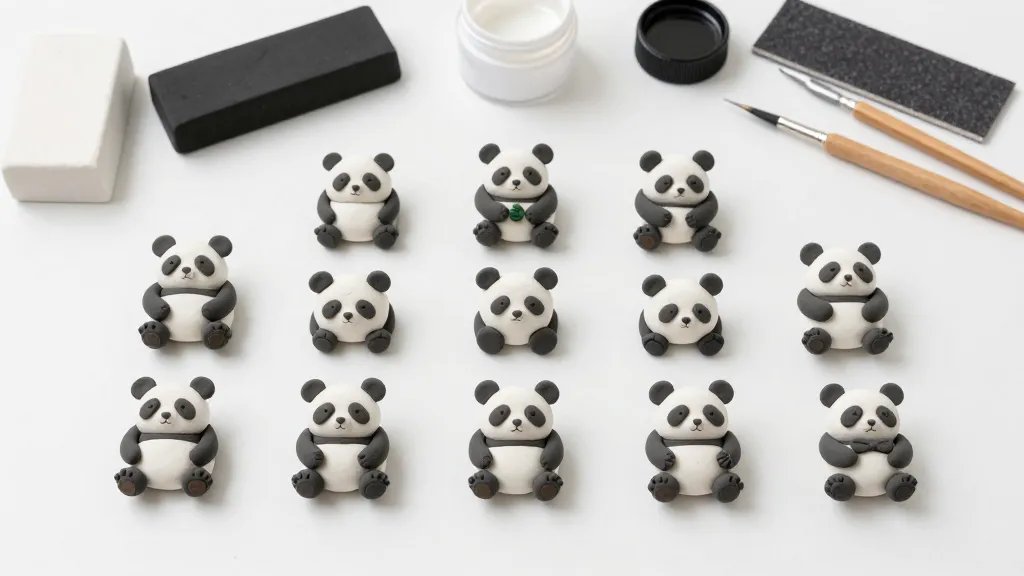
What you’ll need
- White and black polymer clay or air-dry clay
- Clay sculpting tools or household alternatives (toothpick, old scraper, or a spoon)
- Flush-cutting wire or a sturdy needle for tiny detailing
- Sealant or clear varnish (optional, for durability)
- Fine sandpaper or a nail buffer (for smoothing)
Step-by-step: building your panda

Let’s break this down into bite-sized steps so you don’t get overwhelmed. Yes, you can totally pause and resume later—this panda doesn’t vanish in the oven (well, it won’t, if you’re using polymer clay).
Step 1: Shape the body
Roll a teardrop for the body and flatten the bottom so it can stand up. The trick is a slightly wider belly and a rounded back; it reads as friendly, not squatty. If you mess up, roll it back into a ball and start again—practice makes panda perfect.
Step 2: Create the head
Make a ball about the size of a large grape. Slightly flatten the bottom so it sits steadily on the body. You want a gentle, cuddly look, not a zombie head-on-a-body situation. Pro tip: keep the head slightly bigger than the body for that adorable chibi vibe.
Step 3: Ears, eyes, nose
Roll two tiny black ovals for ears and press them onto the top of the head. For the eyes, you can either tiny black beads or sculpt two tiny ovals. Add a small black dot for the nose and a cute little mouth line to complete that signature panda grin. If you’re feeling fancy, give the eyes a tiny white dot to simulate a cheeky gleam.
Step 4: Arms and paws
Roll two short cylinders for the arms and some small rounded shapes for the paws. Attach them to the sides of the body. You want the panda to look like it’s ready for a cuddle, not a fight club cardio session.
Step 5: Fine details
Use a thin tool to carve the eye patches. You’ll slip on the black clay to form the classic panda markings: two big black circles around the eyes and a touch of black near the ears for cohesion. Lightly smooth the edges so nothing looks jagged unless you intentionally want that hand-sculpted charm.
Finishing touches
Time to smooth and set. If you’re using polymer clay, bake according to the package instructions. If you’re using air-dry clay, let it dry completely in a warm, dry spot. FYI, drying times vary—plan for a few hours to a day depending on size and humidity. After it hardens, you can sand a touch for extra smoothness and apply a clear sealant if you want longevity.
Going pro with posing
Want your panda to hold a tiny bamboo shoot or sit jauntily on a stand? Create a small base and a tiny pole to pose it. A little imagination goes a long way here. It’s your panda’s world; you’re just letting it live in it.
Color accident? No problem
Sometimes the clay blend isn’t perfect. You can blend a bit of white with black to create softer patches, or add a tiny bit of gray for shading. Subtle shading gives depth without turning your panda into a grayscale statue. IMO, subtlety is the secret sauce here.
Display ideas and gift potential
- Desk buddies: keep one on your monitor stand for a smile between Zoom calls
- Planter companions: nestle a tiny panda beside a succulent
- Giftable goodness: a homemade panda is a thoughtful present for friends and kids
DIY display tips
Base color contrast helps your panda pop. Consider a soft pastel backdrop or a tiny felt mat to ground the piece. If you want to take photos for social media, set up near natural light and keep a simple background so the panda steals the show.
Common pitfalls and how to avoid them
- Clay cracking during bake: don’t overstuff; keep joints smooth and use a bit of water or clay slip to blend edges.
- Eyes misaligned: attach eyes while the head is still soft, then adjust with a gentle nudge before baking or drying.
- Uneven standing: ensure the base is flat and the body weight is distributed so it doesn’t topple.
Advanced mini tricks
If you’re hooked and want to level up, try these:
- Two-tone fur texture: blend the black patches with a tiny hint of gray for fluffy depth
- Glossy eyes: a tiny drop of clear gloss can give a lifelike sparkle
- Seasonal variants: swap black patches for brown or add a tiny accessory like a scarf
Adding a tiny bamboo prop
Roll a thin cucumber-shaped piece for the bamboo stalk and clip a tiny leaf from green clay. Attach it in one paw to suggest the panda is nibbling. It’s the little storytelling details that elevate your piece.
FAQs
How long does it take to complete a mini panda?
Depends on your speed and detail level. You can pull off a simple panda in 1–2 hours; a more detailed one might take a lazy afternoon. If you stop for snacks, you’ll probably finish by bedtime!
Can I use air-dry clay instead of polymer clay?
Yes, air-dry clay works fine. It just needs longer drying time and a protective sealant to preserve color and shape. FYI, polymer clay tends to be sturdier for small figures like this.
What if the paint or clay chips after finishing?
Sealant is your best friend here. A clear sealant or varnish protects color and keeps surfaces smooth. If chips occur, you can touch up with a dab of clay or paint after sealing.
Do I need baking for polymer clay?
Yes, polymer clay cures in the oven. Follow the manufacturer’s instructions for temperature and time. Don’t skip this step unless you want a floppy panda on your hands—literally.
What’s the best way to photograph my panda for social media?
Natural light + clean background equals magic. Place the panda on a simple surface, shoot at eye level, and keep the frame uncluttered. Add a tiny prop or a plant in the background to add context without stealing the spotlight.
Conclusion
There you have it—a friendly, ready-to-display mini clay panda that’s as charming as a real panda, but without the zoo. This project is perfect for beginners who want quick wins and for seasoned crafters chasing that cute-factor high. So, what are you waiting for? Grab your clay, squeeze in a little goofy energy, and bring home a panda that’s basically the plushy version of your own inner tidy crafter. IMO, your future desk buddy is just a few kneads away.


