
An excited hobbyist moment hits: pastel colors, tiny paws, and a pinch of glitter. If you’ve ever looked at a kawaii shelf and thought, “I wanna make that,” you’re in the right spot. Let’s skip the fancy tools and dive into adorable, beginner-friendly figurines you can whip up this weekend.
What Makes Pastel Animal Figurines So Irresistible
Pastel tones soften any creature into something friendly and approachable. The trick is to keep shapes simple, lines clean, and accents minimal. FYI, the goal isn’t museum quality—it’s charm per centimeter. Do you want something that feels cozy rather than flawless? Then you’re nailing it already.
Materials That Won’t Break the Bank
– Polymer clay in pale pink, baby blue, mint, lavender, and ivory
– Basic sculpting tools or even household items (toothpicks, plastic knife, clay cutter)
– Aluminum foil for armature in larger figures
– Acrylic paints in soft hues + a tiny black marker for eyes
– Clear sealant or varnish for shine and protection
– Optional: tiny beads, fabric scraps, or rhinestones for extra personality
If you’re brand new, start with a tiny kit or a budget mix to figure out your preferred textures. The goal isn’t to stockpile supplies; it’s to keep the project joyful and forgiving.
Five Beginner-Friendly Figures You Can Make This Weekend
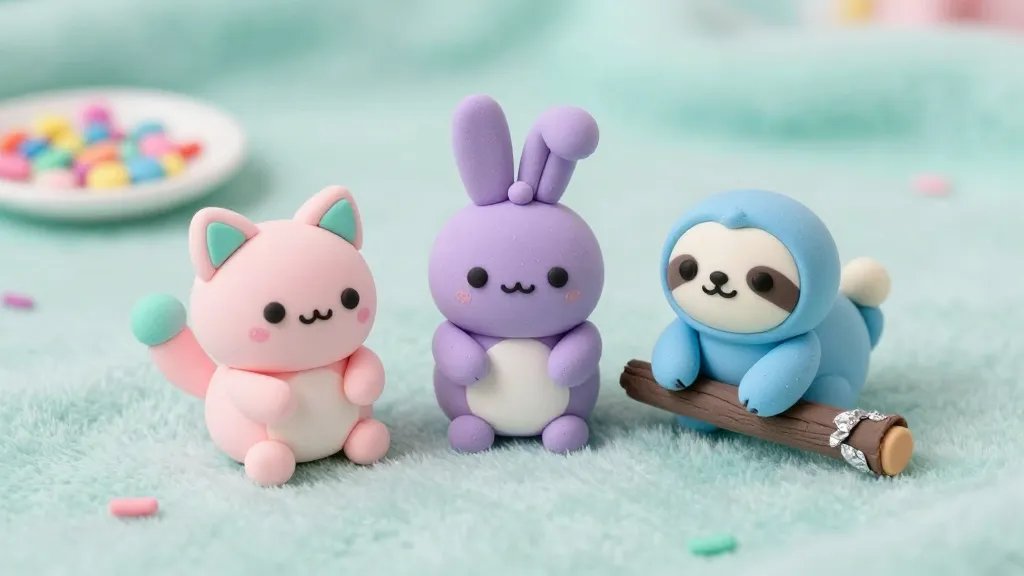
- Mini Bunny in a Cup: A round head, long ears, and a mug with a saucer. Soft colors and a shy smile go a long way.
- Smiling Seal Buddy: A chubby body, a tiny flipper, and a dotty nose. Paint a little blush for instant cuteness.
- Hedgehog with a Shell Hat: A rounded body, prickles simplified as gentle ridges, and a pastel shell perched on top.
- Puffball Puppy: A compact form with a curled tail and perky ears. Add a scarf for extra coziness.
- Koala on a Branch: Pinkish ears, grey body, and a tiny leaf perch. Soft shading makes it feel like a forest friend.
Tips for Each Figure
– Bunny: Keep ears proportional and avoid sharp edges. Use a dab of white paint to highlight cheeks.
– Seal: Round the body with a smooth belly; a white paint dot for eyes makes it instantly cute.
– Hedgehog: Use a small clay needle or toothpick to create the “prickles” texture without overdoing it.
– Puppy: A little tilt of the head and a tiny pink tongue peeking out sells the character.
– Koala: Focus on oversized ears and a comfy, rounded belly.
Shaping and Smoothing Like a Pro (Without the Pressure)
The first rule is: don’t stress about perfection. Smooth surfaces catch light and look neat, but cozy lumps are charming too. Here’s how to keep things smooth without turning into a perfectionist.
– Build a simple armature with foil for larger pieces. It saves on clay and keeps the figure sturdy.
– Use a little water or a needle tool to smooth seams, then let the clay rest for a few minutes. You’ll see the surface relax.
– Work in small pieces and join gradually. It’s easier to control shapes this way.
– Bake carefully. Follow your clay’s temperature guide and allow extra cooling time.
Common Pitfalls (and How to Avoid Them)
– Too much detail: Tiny features read as noise on small figurines. Reserve eyes, noses, and blush for the last pass.
– Uneven legs or uneven bases: Add a flat base or use a tiny amount of clay to level the feet.
– Cracking after baking: Don’t rush to bake; ensure joints are well joined and surfaces aren’t too dry before going in.
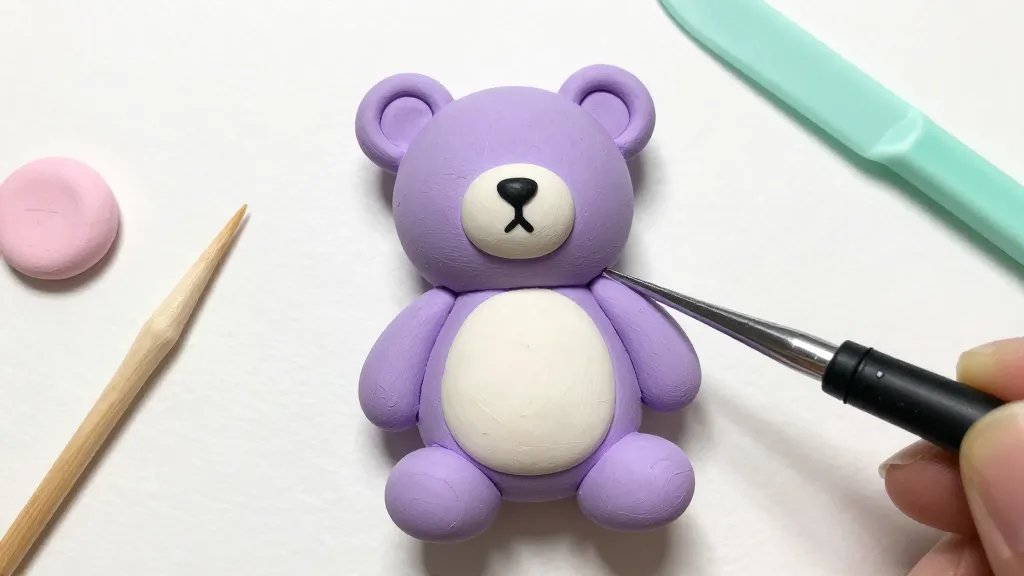
Painting Like a Pro (Even If You’re a First-Timer)
Paint adds magic. Start with a white base, then build color in layers. Use a fine brush for eyes and tiny features.
– Eyes: Two tiny black dots or a single curved line gives personality. Add a white dot for a sparkle.
– Blush and accents: Light pink or peach on cheeks looks adorable but never overdo it.
– Sealing: A clear sealant protects your art and gives a gentle gloss or matte finish depending on your vibe.
Layering Techniques for Depth
– Base coat: Pale color, thin even layer.
– Mid-tone: Slightly darker shade for shadows along the sides.
– Highlight: A touch of white or lighter color on the top edges.
– Finish: A matte or gloss sealant changes the mood of your figures.
Display Ideas That Make Your Creations Shine
– Mini gallery shelf: A row of pastel figurines creates a calming vibe.
– Tiny display diorama: A felt blanket, little clay trees, and a tiny teacup set up the scene.
– Seasonal vibe: Swap accessories—scarves in winter, flowers in spring, tiny sunglasses for summer touches.
DIY Mini Accessories
– Tiny yarn scarves: A quick knit or crochet adds texture.
– Felt hats: Simple cones or rounded shapes perched on top for character.
– Little cookies or teacups: Lightweight props that tell a story about each figurine.
Honing Your Little Studio Habits
Consistency beats intensity. Set a tiny studio routine that feels like play, not chores.
– Schedule 20-30 minutes for a quick sculpt session a few times a week.
– Keep a small wipe-able mat and a tray for cleanups. Mess-free work is more inviting.
– Photograph progress on the same day each week. You’ll see improvement fast, I promise.
Keeping Your Momentum
– Start with a simple plan: finish one figure per weekend.
– Share progress with friends or on a hobby group. Positive feedback fuels momentum.
– Celebrate the small wins with a spritz of glitter or a shiny sealant—tresents to yourself count as progress.
FAQ
What clay should beginners buy for pastel animals?
Polymer clay is forgiving and versatile for beginners. Look for a neutral starter kit with pastel options. Bake times vary by brand, so follow the package directions closely. FYI, you don’t need fancy brands to get cute results.
How long does it take to make a figurine?
Most simple figures take 30-90 minutes of hands-on time, plus drying or baking. If you’re new, plan for a couple of sessions to get comfortable with shaping and smoothing. Don’t rush—enjoy the process.
Can I paint after baking, or should I paint before?
Both work. Painting after baking gives you crisp details. Some people prefer painting before and then sealing to preserve color. Try one method on a practice piece to see what you like.
How do I keep my pastel colors vibrant?
Seal the final piece with a clear finish to protect colors. Store the figurines away from direct sunlight to prevent fading. If you’re going to display them, consider a light, dry spot rather than a humid bathroom shelf.
What if my figure cracks during baking?
Cracks usually mean air bubbles or uneven heat. Gently sand the surface, rejoin pieces with fresh clay, and bake again following the guidelines. If you’re unsure, test bake a small piece first.
Any tips for making a batch quickly?
Set up a “production line”: one person shapes, one paints, one seals, and one photographs. Small, repeatable steps help you finish more in less time. Also, keep a little queue of simple shapes to reuse ideas quickly.
Conclusion
Starting with cute pastel animal figurines is like getting a backstage pass to tiny, joyful creativity. You don’t need perfect technique—just a willingness to have fun and a little patience. FYI, the more you practice, the faster and cuter your pieces become. So grab some pastel clay, pick a simple shape, and start a mini collection that’s all your own. Remember: every little nibble of effort adds up to a big dose of charming whimsy.


