If you’ve ever wished your desk could vibe with cute and tasty vibes, you’re in the right place. We’re making kawaii sushi out of clay, and yes, it’s as delightful as it sounds. Grab some scraps, a toothpick, and your sense of whimsy—let’s dive in.
What You’ll Need to Get Started
Starting is the hardest part, but it gets easy fast once you’ve got the basics. Here’s a quick shopping list that won’t break the bank:
- Air-dry clay in white, pink, orange, black, and green
- Clay conditioning tools or simple household items (toothpicks, needles, small rolls)
- Acrylic paints for tiny details
- Sealant or mod podge for a cute, durable finish
- Optional: a baking oven if you’re using polymer clay
FYI, you don’t need fancy gear to start. A lot of the magic happens with patience and a little imagination.
Shape Basics: Getting That Sushi Look Alike
The fun part is turning clay into little sushi bites. Here’s a simple approach:
- Make a small oval for the rice. Keep it soft and slightly squishy.
- Roll a flat tiny rectangle for the nori seaweed wrap—super thin works best.
- Wrap the rice with the nori and pinch to seal. You’ve got a mini nigiri!
- For a maki roll, roll a cylinder and press flat to resemble a cut piece.
Pro tip: smooth edges with a damp brush or your fingertip to avoid harsh lines. The cuteness thrives on neatness.
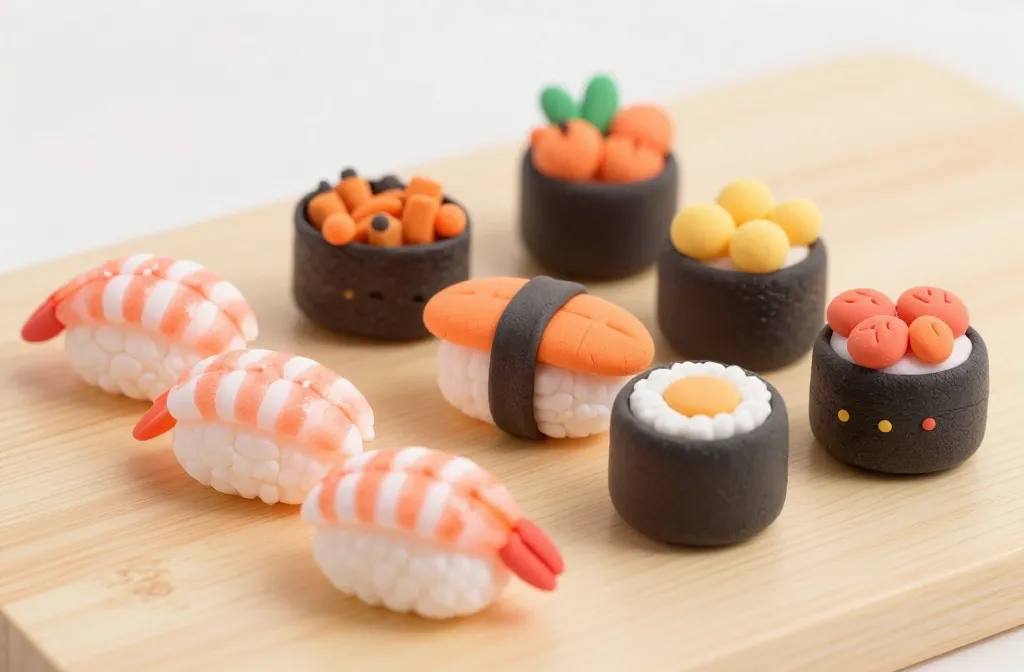
Crafting the Classic Pieces: Tamago, Salmon, and Avocado

Let’s diversify your kawaii platter with some iconic toppings.
Sweet Tamago (Egg) Nigiri
– Create a small yellow bead and flatten into a tiny rectangle.
– Add a glossy glaze by brushing on a light clear paint or gloss.
– Place on rice, then a slim strip of nori to finish.
Salmon Nigiri Charm
– Mix orange with a hint of pink for depth.
– Form a teardrop shape, press onto rice, and add a white line to mimic fatty stripes.
– A dab of gloss makes it look fresh off the sea.
Avocado Slices for Colorful Drama
– Roll a thin green sheet and slice into half-moon shapes.
– Layer over a rice base with small gaps for that real sushi vibe.
– Use a tiny paint dot for seeds or a sprinkle of black sesame if you’re feeling fancy.
Fine Details That Elevate Your Collection
Small touches create big impact. Don’t skip these:
- Eyes and smiles: tiny black dots or tiny white highlights give personality
- Shiny glaze: a light coat of sealant makes colors pop and prevents chipping
- Tiny figures: add a cheeky chopstick friend or a tiny soy sauce bottle for a story
If you mess up, don’t panic. A quick sand or a new layer of clay can fix most things. DIY is all about experimentation.
Strings, Stands, and Display Ideas
Your kawaii sushi deserve a stage. Try these:
- Attach a slim magnet to the back for fridge display
- Glue to decorative mini platters for a playful shelf vignette
- Use as desk accessories or keychains with a jump ring
Triple-check that your pieces are fully dry before you move them to avoid a sad break.
Common Mistakes (And How to Dodge Them)

Even seasoned crafters trip up now and then. Here’s how to stay smooth:
- Clay crumbles when too dry—keep pieces slightly soft and work in small batches
- Peeling paint on tiny details—seal with a clear coat after paint dries
- Sushi looks flat—thicken some pieces with small stacked layers for depth
If you’re unsure, take a tiny break, come back with fresh eyes, and you’ll spot the fix in seconds.
FAQ
Q: Do I need to bake the clay?
Most kawaii sushi clay projects use air-dry clay, which dries on its own. If you’re using polymer clay, follow the package instructions for baking times and temperatures. Always work in a well-ventilated area and avoid overheating your pieces.
Q: How long does it take to finish a batch?
Depends on how many pieces you’re making and your speed. A simple set can dry in a few hours, but I’d budget a day for multiple pieces and some polishing time.
Q: Can I color mix for more realistic tones?
Absolutely. Mix small amounts of paints to create depth—think subtle shadows on the rice and gentle gradients on toppings. FYI, start with a tiny amount of paint and build up slowly.
Q: How do I fix a broken piece?
Glue is your friend, and a dab of fresh clay can patch it like new. Sand lightly after drying to blend the seam. If all else fails, you’ve still got a cute failed experiment to photograph for the ‘fails’ story. We’ve all been there.
Q: What’s the best way to display these?
Use a shallow tray with a soft background, like felt or foam. Add tiny accessories—mini chopsticks or a soy sauce bottle—to tell a story. Display them on a sunny shelf for the ultimate kawaii vibe.
Final Tips for Viral-Ready Cute Creations
If you’re posting your creations online, a few tips can help you reach fellow crafters and hungry-for-cuteness viewers:
- Take bright, clean photos with natural light. A white background makes colors pop.
- Share your process in short clips or a multi-photo sequence. People love the DIY journey as much as the final piece.
- Caption with playful, relatable words. Emojis are cool when used sparingly.
Remember, it’s not about perfection; it’s about charm. Your adorable sushi will win hearts and maybe a few new followers who want to learn your secret method.
Conclusion
Kawaii sushi clay is a joyful project that blends creativity with a dash of whimsy. Start simple, layer on the details, and don’t fear a few oopsies along the way. With a sprinkle of patience and a generous helping of fun, you’ll end up with a tiny, tasty-looking set that brightens up any desk or shelf. Ready to roll? Happy crafting!


