An introduction that hits fast: you know those clay sculptures of chocolate bars with goofy faces? They’re not just cute—they’re tiny stories you can bite (figuratively) into. Grab a seat, because we’re diving into a chewy, colorful world where clay becomes chocolate, and characters come to life with a wink and a smear of icing.
Meet the Cast: Clay Chocolate Bar Characters 101
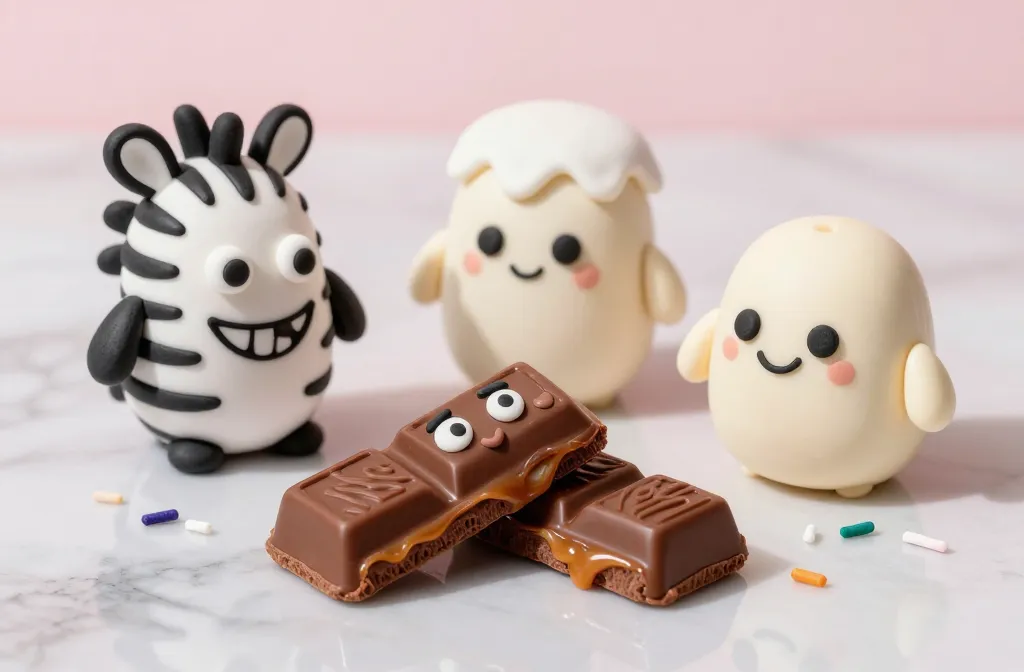
Clay chocolate bars aren’t just sweet snacks on a shelf; they’re characters with personality, backstory, and a giggle-worthy vibe. Each bar has its own quirks—one might be studiously neat, another mischievously melty. The materials are simple, but the stories are big. Ready to meet the main players?
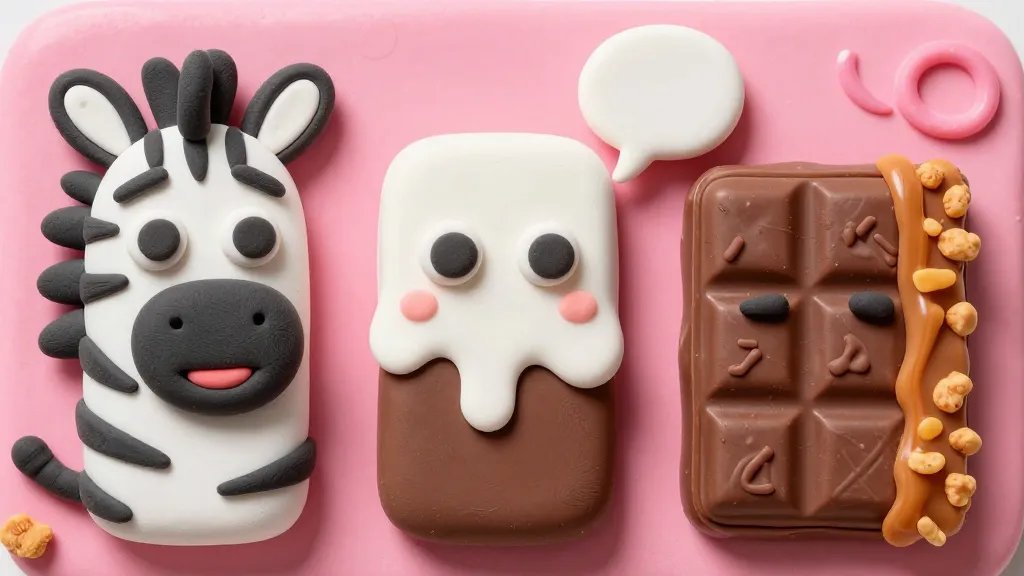
- The Zany Zebra Stripe—a rebel with a chocolatey heart and a penchant for dramatic drip effects.
- The Chill Milk Solid—calm, collected, and always ready with a pep talk when the chocolate starts to melt under pressure.
- The Crunchy Caramel Duo—two pals fused for flavor and chaos; they never agree on diners, but they always agree on fun.
- The Vanilla Whisper—soft, sweet, and the voice of reason when the group spirals into sprinkles and glitter.
Why clay, you ask?
Clay lets you bend reality without losing the vibe. You can sculpt a character with a goofy grin in five minutes or spend an afternoon perfecting a tiny, triumphant drip. It’s accessibility meets artistry, and the results feel personal—like a doodle you actually want on display.
From Sketch to Snack: The Creative Process
Creating clay chocolate bar characters is part art, part play. It’s about capturing a vibe as much as it is about the shapes. Here’s a quick peek at how the magic happens.
- Idea Burst: Start with a vibe or situation. A character who hates hugs? A bar obsessed with perfect packaging?
- Base Shape: Roll your clay into a bar shape, then decide where facial features will land. Don’t overthink it—snapping into a goofy grin feels instantly charming.
- Texture Details: Add ridges for the chocolate bar, a glossy finish for the melt, or tiny sprinkles for personality points.
- Expression Engineering: Eyes, eyebrows, and mouth transform the mood. A raised eyebrow can scream “mischief,” while a tiny smile says “let’s snack and chat.”
- Story Stitch: Give each character a silly backstory so they feel alive beyond the surface art.
Tools of the trade
– Polymer clay in a handful of colors
– A basic set of sculpting tools or even toothpicks for details
– Gloss glaze for that shiny chocolate look
– Small magnets or stands if you want to display them like a miniature gallery
Character Spotlight: The Melty Mood Board
Let’s zoom in on a few standout personalities you can recreate or remix in clay.
The Melter With a Motto
This character melts under pressure but always has a hilarious comeback on the way out. Give them a tiny cape or a speech bubble to boost their hero aura. FYI, they look especially adorable with a glossy drip that travels diagonally across the bar.
The Sprinkles-Snob Duo
Two bars who argue about the optimal sprinkle ratio. They’re dramatic, tiny, and somehow cooler than they should be. Use contrasting colors and small sprinkle bits to emphasize their personalities. The laughter when they finally compromise is the real treat.
The Quiet Crunch
A bar that communicates with texture instead of words—crunchy details convey mood. When you tilt the bar, you see little crack lines that tell a story without saying a word. This one is a crowd favorite for photographers and mood-lit shelves alike.
Storytelling Through Display: How to Show Off Your Clay Characters
What’s the point of sculpting if you don’t share the story? Here are some low-stress ways to stage your characters.
- Mini Comic Panels: Place the characters in tiny storyboard frames that capture a moment—like a dramatic drip or a goofy laugh.
- Character Cards: Create a one-liner bio for each bar—your tiny marketing team, if you will.
- DIY Dioramas: Build a little shelf scene—think chocolate river, cookie mountains, and candy cloud skies.
Common Pitfalls (And How to Avoid Them)
Because no one wants a top-heavy bar with a sagging belly of clay, here are a few tips to keep things sturdy and cute.
- Overworking clay: It dries out fast and loses shape. Keep a damp cloth handy and work in small sessions.
- Uneven surfaces: Smooth with a tool or your finger to keep the bar looking sleek and edible in theory.
- Fragile seams: Conceal joints with a drizzle of painted or glazed texture so it reads as a single piece.
- Color consistency: Mix a few colors early and document your hues to keep characters cohesive across a set.
3 Quick Projects You Can Start This Weekend

If you’re itching to make something, here are bite-sized ideas that don’t require a marathon session.
- Two-Character Snack Break: Sculpt two bars, one melty, one crisp, and pose them sharing a peppermint candy moment.
- Holiday Edition: Turn a classic bar into a seasonal character with tiny holiday accessories (a scarf, a Santa hat, seasonal sprinkles).
- Story in a Shelf: Build a tiny display shelf featuring three friends with a caption that hints at their ongoing adventure.
FAQ
Is clay chocolate bar character making suitable for beginners?
Yes. Start with simple shapes and a limited color palette. As you get the hang of texture and expression, you’ll naturally level up. The best part: you can undo mistakes with a quick re-sculpt or a glaze fix.
What materials do I need to get started?
Basic polymer clay, a few sculpting tools, a glaze for shine, and a small work surface are all you need. Optional: magnets or stands if you want to display your characters upright.
How do I prevent the clay from cracking?
Keep clay conditioned to a workable temperature, work in short sessions, and seal exposed seams with glaze once fully cured. If you see tiny cracks, a light re-wetting and smoothing often fixes them.
Can I customize characters for gifts?
Absolutely. A clay chocolate bar character makes a charming, handmade gift. Personalize with names, colors, and a mini backstory to add a heartfelt touch.
How long does curing take?
Most polymer clay projects cure in about 15-30 minutes per 1/4 inch of thickness in a standard oven. Always follow the clay brand’s instructions for best results.
What about painting details after curing?
Painting after curing is common, but use acrylics and seal with a glaze to keep colors vibrant and durable. A tiny brush and patient hands go a long way.
Closing Thoughts: Why These Clay Characters Win Hearts
Clay chocolate bar characters are the goofy, tactile antidote to screen time. They’re easy to make, endlessly remixable, and—let’s be real—ridiculously photogenic. IMO, the best thing about them is the storytelling potential: a simple bar can carry a whole mini-series of adventures, friends, and occasional dramatic drips.
If you’ve got a spare afternoon, give yourself permission to play. FYI, you’ll likely end up with a display shelf that makes your coffee mug jealous. The joy isn’t just about the end result; it’s the tiny triumphs along the way—the perfect smile, the flawless drizzle, the moment your character finally looks like it’s winking at you. And yes, that’s exactly the vibe you want from clay chocolate bar characters.
Conclusion
Clay chocolate bar characters blend whimsy, craft, and storytelling into something wonderfully tangible. They’re a delightful project for beginners and a charming playground for seasoned crafters. So grab your clay, decide on a vibe, and start sculpting your tiny chocolate crew—one goofy face at a time.


