An easy, bite-sized guide to turning simple clay into quirky magnets. You’ll learn quick techniques, find finish-that-wow factor ideas, and walk away armed with a project you can finish in an afternoon. Let’s dive into the satisfying world of clay, magnets, and a dash of personality.
Materials You’ll Actually Want to Use
– Air-dry clay or polymer clay, depending on your vibe and patience.
– Craft magnets or ready-to-go magnetic dots.
– Acrylic paints or markers for bright details.
– Sealant to keep colors glossy and magnets sticking around.
– Basic tools: a rolling pin, small crafting knife, needle tool, and a paintbrush set.
FYI, you don’t need fancy gear to start. A spoon and a toothpick can become your best friends when you’re feeling thrifty. The key? smooth surfaces, clean edges, and a plan for size that matches your magnet backing.
Design It: Quick Brainstorm That Actually Works
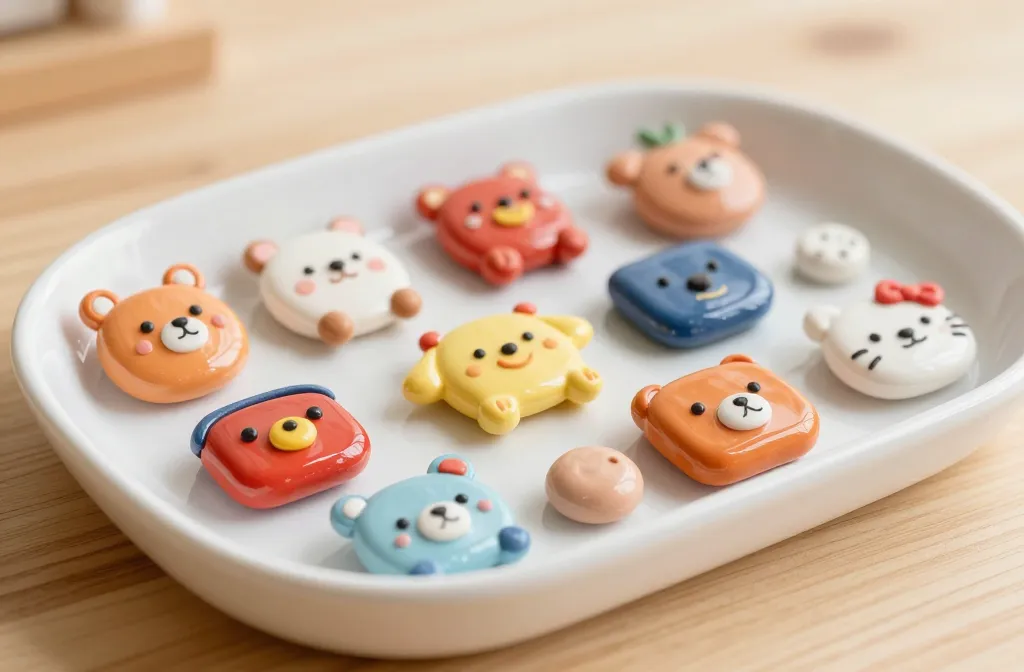
Start with a tiny sketch or three on scrap paper. Think about shapes you love: cute animals, retro icons, plants, food—whatever sparks joy. Pro-tip: aim for 2–3 color families so your magnets look cohesive on the fridge.
Subsection: Theme, Color, and Scale
– Choose a theme you won’t get sick of after seven pieces. Consistency helps your mini-collection feel intentional.
– Pick 2–3 complementary colors. If you’re unsure, pick a bold accent color and a couple of neutrals.
– Keep the magnets roughly the size of a bottlecap for ease of handling and a tidy display.
From Dough to Doughnut Missed: Making the Shapes
Cut out little shapes with a sharp blade or cookie cutters. Don’t overwork the clay—soft is good, but sticky isn’t. If something feels off, roll it back into a ball and start again rather than forcing it.
Subsection: Texture and Dimension
– Add tiny textures with a toothpick for personality: speckled onions, leaf veining, or tiny polka dots.
– For raised designs, arch your tool gently along the edge to lift the surface. It gives you a subtle 3D lift without crazy bulges.
Straighten Up: Smoothing and Prepping for Paint
Smooth edges and flat backings help magnets stick better. If you’re using air-dry clay, let it firm up until it’s ready to handle but not hard as a rock. For polymer clay, bake according to the package.
Subsection: Why Backings Matter
– A flat back ensures the magnet sits flush against metal. Nobody wants a magnet that rocks like a ship in a storm.
– If your design is thick, consider adding a little notch or flat spot so the magnet dots don’t melt into the clay like a mystery.
Color Pop: Painting and Patchwork
Paint dries fast, so work in thin layers. Too much paint can cause cracking or smudges. Seal across the top with a clear coat when you’re done to protect the art and prevent smudging when you stack them.
Subsection: Layering Tips
– Start with base colors, then add details once the base is dry.
– Use a fine brush for tiny lines or lettering; a marker can work in a pinch but test it first on a scrap piece.
Seal the Deal: Finishes That Last
A good sealant is your best friend. It protects the paint, reduces fingerprint smudges, and helps magnets cling longer. Let the sealant cure fully before you handle them too roughly.
Attach the Magnets: The Final Step
– Glue a small magnet dot to the back with a strong, quick-drying adhesive.
– Let it dry completely in a flat position so the magnet sets evenly.
– If you’re worried about the magnet coming off, add a second dot and let the glue age for a bit longer.
Subsection: Safety and Longevity
– Work in a well-ventilated area when you’re sealing or gluing. FYI, stinky fumes aren’t cute.
– Don’t over-glue; a tiny dab goes a long way. Too much glue can seep into the front and ruin your paint job.
Creative Variations: Make It Your Own
– Mini message magnets: write short words or phrases with a fine-tip pen or paint on tiny banners atop your shapes.
– Seasonal sets: make a few holiday-themed pieces and swap them out when the mood strikes.
– Texture experiments: press a patterned object into the clay for a unique imprint.
Subsection: Gift-Ready Setups
Package a small handful of magnets with a cute card and a note about how to care for them. Personal touches turn a simple craft into a cherished gift.
Care and Display: Keeping Your Magnets Looking Fresh
– Wipe with a damp cloth to remove fingerprints; avoid soaking.
– Store them flat so the magnets don’t pop off or bend the shapes.
– If colors start fading over time, a light repaint might bring them back to life.
FAQ
What kind of clay is best for beginners?
Clay options vary. Air-dry clay is forgiving and quick, while polymer clay needs baking but holds up beautifully. Pick what fits your schedule and patience level. Both work with magnets, so you won’t go wrong.
How long does the magnet stay attached?
With a good adhesive and a clean back, magnets stay put for a long time. If you’re rough with them or drop them, you might need a touch-up, but that’s part of the charm of handmade stuff, right?
Can I make these with kids?
Absolutely. Keep the projects simple, supervise baking if you use polymer clay, and let kids pick colors and patterns. It’s a blast to watch tiny artists create fridge-worthy art.
What about outdoor use?
These are best kept indoors. Prolonged sun or moisture can degrade both paint and clay. Treat them as indoor accents with a little drama.
How can I personalize magnets for a party or event?
Make a batch with themed shapes and colors, then add personalized initials or short messages. It’s a fantastic party favor that doubles as decor.
Conclusion
Friend, you’ve got this. Handmade clay magnets are one part simple craft, one part personality, and a whole lot of satisfying “I did that” moments. Start with a couple of shapes, pick a color story you love, and you’ll be surprised by how quickly you rack up a little collection. FYI, the most rewarding part isn’t perfection—it’s the process, the little mistakes that become charm, and the joy of showing off your unique fridge gallery. So grab your clay, some magnets, and let your imagination magnetize your kitchen life.


